Pages

Monday, April 29, 2013

Haphazard Homestead Happenings

Where does the time go?  The days are just flying by lately and so much is happening around here.

The gardening is beginning to show signs of growth.  Except for the potatoes, onions and ginger, everything we planted this year went directly into the ground as seeds.  Almost all the little seedlings have started to come up.  We have carrots, onion, radishes, peas, lettuces, Swiss chard, spinach, broccoli, Brussels sprouts, cabbage, kohlrabi, turnips, and beets.  No signs of cauliflower yet, though.  We've been eating asparagus on a regular basis, and some of our rhubarb is almost ready to harvest.

We had a couple of nights of freezing temps last week (in late April?), but we covered everything and it all made it.  The weather, and therefore the garden, are running a few weeks behind this year, and I'm wondering now if we'll have any room for our late spring plantings that I had thought would follow behind some of the early crops.  Oh well, we might just have to build another raised bed or two.

Like everything else, our flowering trees are behind schedule.  Our red bud, white bud and crab apple are just now starting to bloom.  One of our young rhododendrons is in full splendor right now, though.


**********

I have almost completed my April craft project and I'm pretty sure I'll be able to finish by tomorrow afternoon.  Look for it on Wednesday, along with the rest of my April goals update.

**********

For those who enjoy hearing about Bob the Basement Cat, he is doing well, but we've come to the conclusion that he is either partial or completely deaf.  I'm not sure how we missed it, actually.  We can often go in and out of the basement and do whatever we need to do, and if he's asleep or just looking away from us, he might never realize we're there.  Also, when you speak or make other noises, his ears don't move toward the sound, not even a little.  It might also explain why his meows are so very loud and might be the reason he craves touch so much.

**********

Our weekend schedules are filling up fast for spring/summer.  A couple of biggish home improvement projects, a trip to the zoo on Mother's Day, a day of city-wide garage sales, and camping, have us booked up for most weekends until after Independence Day.

**********

19 more days until school is out for Kat, possibly for good!  We have decided we will unschool her once this year is over.  Learning about this lifestyle change is huge in our lives right now and is what I've been spending much of my time on recently.  I promise, though, that this shift won't turn this into an unschooling blog.  I'm not sure I'll blog about it much at all, but if I do, I'll spin it off to a separate blog much like I do with our RVing stories.  Just thought I'd mention it, since it's been taking me away from the blog and Facebook page lately.

**********

I apologize again for not being around to visit your blogs and pages much lately, but I'm going to try to remedy that this week. 

Monday, April 22, 2013

The Finally-Finished Door

Some of you may remember us replacing our nasty old sliding patio door with a new wood-framed door with operating side lights.  You can read about it and see the pictures here.

It remained the Not-Quite-Done Door for more than a year.  Exactly nothing else happened with it until this past week, when Shane finally found the time and inspiration at the same time to finish the project.  He added the surrounding trim, stained the wood, lacquered it, and even touched up the aqua paint above the door (and in other places around room). 

It looks great now, and it's nice to finally mark it off our to-do list as completed. No, make that completely completed.  Now all that's left to do in the kitchen/dining room is the new floor.  We have the supplies, so it's another matter of time and inspiration coinciding.

Taping off.

See the small piece of blue tape near the top of
the window?  Swiper's getting ready to swipe it.


Finished!

**********

While we were at the home improvement store buying lacquer and a quart of paint to match the walls, we started looking at a product called Deck Restore by a company called Synta.  It's a "liquid armor resurfacer".  It's similar to the Rhino Linings for truck beds, only it's for decks and/or concrete. 

We looked at the information in store and had nearly decided it would be a good addition to our deck for a number of reasons.  About that time, a salesman (not on commission, BTW) walked up to us and told us how great a product he thinks it is and answered a lot of questions we had based on his experience with it at his home.  In the middle of our conversation, a customer passing by interupted to say, "That stuff is amazing! It's just simply amazing!"

Our only questions now are what color we want, and when we'll have the time to apply it.

**********

My apologies for not taking time to comment on your blogs, if I get to them at all, and for not being around on my Facebook page very often this past week.  That goes for the foreseeable future, too. We have several "projects" going on here and my online presence hasn't been a top priority.  I hope you'll bear with me; things will surely return to what we call normal sooner or later.

Friday, April 19, 2013

Couldn't-Be-Easier Strawberry Ice Cream


Our strawberry plants are beginning to bloom, so it won't be long before we have enough berries for ice cream!  This ice cream has just four ingredients and doesn't require an ice cream freezer.  I used frozen strawberries from last summer for this post.  I have also used blackberries, raspberries, and peaches with good results.  Just make sure they are solidly frozen first, and adjust the sweetness after everything else is blended.  You may not need as much sugar as you think.

This ice cream is fresh tasting, and both sweet and tangy at the same time.  I think you'll love it!


Couldn't-Be-Easier Strawberry Ice Cream

2 cups of frozen strawberries (if frozen in syrup, reduce or eliminate sugar)
2 cups heavy cream (I had and used raw cream, but any heavy cream will do)
1 teaspoon vanilla extract
sugar to taste; amount depends on fruit and whether or not it has a syrup

Place frozen berries in bowl of a food processor with the chopping blade attached.  Process berries until ground into fine bits, almost like a course powder.  Warn your family and pets first that this will make A LOT of noise.

Add vanilla. 

Add cream gradually while continuing to process, until the mixture is the consistency of soft-serve ice cream or a very thick milkshake.  Stop processor and scrape down sides as needed. 

Taste for sweetness; add sugar or other sweetener 1 Tablespoon at a time until desired sweetness is reached.

Spoon ice cream into a freezer-safe bowl with lid and chill until firm, 1-2 hours.  Alternately, you can spoon the soft mixture into traditional freezer-pop molds or silicone yogurt/popcicle molds for individual frozen treats.

Makes about 1 quart of ice cream.

Wednesday, April 17, 2013

Healthier Nacho Chicken Casserole

Recently I saw a recipe for a Mexican-style cheesy chicken casserole that sounded tasty, but it had a few ingredients I'd rather not use, like canned cream of chicken soup, white rice, and packaged taco seasoning.  It also had pre-shredded cheese (eww - cellulose) and canned corn (eww - I don't like it).

I decided to make some changes so that I'd feel better about eating it and serving it to my family.  Here's my version, which I think is a little more nutritious.


Healthier Nacho Chicken Casserole

3 Tablespoons butter
3 Tablespoons unbleached white or whole wheat flour
1-1/2 cups chicken broth (preferably homemade)
1-1/2 to 2 cups cooked brown rice (1/2 cup before cooking)
1 medium ripe tomato, diced
1-1/2 cups frozen kernel corn
1/4 cup diced red bell pepper
1/4 cup diced green bell pepper
1 can (4 oz.) diced green chiles, with liquid (could use 1 large fresh mild chile, seeded and diced)
2 Tablespoons homemade taco seasoning (or 1 packet of store bought seasoning)
1-1/2 cups shredded cheddar cheese (shredded from block cheese), divided
2 cups diced cooked chicken (either light or dark is fine)

Heat oven to 350°F.  Spray a 2-quart baking dish with pan spray.

Melt butter in a medium saucepan.  Stir in flour.  Cook and stir for 1-2 minutes.  Whisk in chicken broth and bring to a boil, stirring constantly.  Whisk until mixture thickens.  Set aside.

In large bowl, combine rice, tomato, corn, red and green bell pepper, chiles, taco seasoning, 1 cup of cheese and chicken.  Pour thickened chicken broth over mixture and stir until well combined. 

Transfer mixture to prepared baking dish and bake for 30 minutes or until heated through.

Top with remaining 1/2 cup cheese and the crushed tortilla chips.  Return to hot oven for 10 minutes.  Serve hot.

Makes 4 to 6  servings.


Monday, April 15, 2013

To Forage or Not To Forage?

An odd but decidedly cool thing happened in our family recently. 

A couple of weeks ago, I entered a book giveaway for a book about foraging called Dandelion Hunter:  Foraging the Urban Wilderness.  I was lucky enough to win, and I started reading it last week.


At about the same time, without having discussed the book I won, Shane joined a Facebook group centered on foraging Missouri wild edibles.

Also at the same time, without any of us knowing what the others were doing, my son-in-law began foraging for wild edibles in his own neighborhood.

While we've each eaten the occasional berries, nuts, wild mushroom or wild greens, as far as I know, none of us have ever had a driving interest in foraging wild edibles for either culinary or medicinal uses.

Some say there are no coincidences, so I'm taking this as a sign we're on the right track in taking up this line of study, whether for fun now or for more serious reasons in some unforeseen future.  Many plants and fungi can be mistaken for others, causing skin irritations, illness or even death.  The way I see it, three sets of knowledgeable eyes are better than one or two.

Meanwhile, I'm beginning to believe we have a lot more to eat in our garden than we planted!

Do you forage wild edibles or do you know anyone who does?  If so, are your reasons more culinary or medicinal?

Friday, April 12, 2013

Simple Sausage and Egg Casserole

Here is an easy recipe that I adapted from a few others I found online and in cookbooks.  Add toast, biscuits or some homemade pastries, and maybe a bowl of fruit, and you have a simple weekend breakfast or brunch.  It can be made in the morning or the night before.


Simple Sausage and Egg Casserole

1 pound pork breakfast sausage
3-4 large potatoes
8 eggs
1-1/2 cups milk
1 teaspoon seasoned salt or seasoning blend of choice
1/4 teaspoon ground black pepper
1 Tablespoon snipped fresh parsley (or 1/2 teaspoon dry parsley flakes)
1 cup shredded cheese of your choice

Meanwhile, crumble and brown sausage in a large pan or skillet.  Drain; rinse if desired.  Spread cooked sausage in bottom of 9 x 13 baking dish that has been sprayed lightly with non-stick spray.

Peel potatoes and cut into 3/8" dice.  Bring to a boil in salted water and let boil about 1 minute.  Drain, then spread over sausage in pan.  Alternately, use a package of frozen chunky hash browns. Set pan aside to allow sausage and potatoes to cool.

In large bowl, combine eggs, milk, seasoned salt, pepper and parsley.  Beat until well combined.  Pour mixture over cooled potatoes and sausage.

To bake immediately, heat oven to 350°F.  Sprinkle casserole with cheese and bake for 20-25 minutes or until knife inserted in center comes out clean.

To make ahead, cover sausage, potatoes and egg mixture, then refrigerate overnight.  When ready to bake, heat oven to 350°F.  Uncover casserole and sprinkle top with shredded cheese.  Bake uncovered for 40-45 minutes or until knife inserted in center comes out clean.

Makes about 8 servings.

Wednesday, April 10, 2013

Simple Soap


I just wanted to show off my latest batch of homemade soap that I made yesterday.  These are actually shampoo bars, but the difference is in the ingredients, not the method of making them.

This is my first batch of hot-process soap.  It was made in a Crock Pot and only took about 90 minutes, including clean-up.

In the past I've always made cold-process soaps.  There are advantages to each method, but in terms of curing time, hot-process wins hands down.  While still soft, it can be used the day after it is made, as opposed to several weeks of curing time with the cold-process version.

Because it was my first time, I didn't try to take any photos as I made it.  I plan to make another batch this weekend and will try to enlist Shane's help so that I can write a tutorial with pictures.  Stay tuned for that.

Friday, April 5, 2013

Coconut-Carrot-Zucchini Snack Bars

I made these bars for my family's breakfast, but they are great for snacks or lunchbox treats as well.  Use any frosting or glaze recipe you like (I used this one), or to keep things simple, add the nuts to the batter and give the bars a quick dusting of powdered sugar.


Coconut-Carrot-Zucchini Snack Bars


2 eggs
1/2 cup brown sugar
1/2 cup coconut oil (or oil of choice, but the coconut oil adds flavor)
1/4 cup honey
1 teaspoon vanilla extract
1/2 cup shredded coconut
1 cup shredded carrot (1 large carrot)
1 cup shredded zucchini  
1 1/2 cups flour
1 teaspoon baking powder
1/2 teaspoon ground ginger
1/4 teaspoon baking soda
1/4 teaspoon salt

1/2 C chopped nuts of choice (optional) (I used walnuts)

Heat oven to 350°F.  Lightly coat a 9x13 pan with pan spray.

In a large bowl, whisk together the eggs, brown sugar, coconut oil, honey and vanilla until smooth. Mix in the carrot, zucchini and pecans.

In a separate bowl, combine flour, baking powder, ginger, baking soda and salt. 

Add the flour mixture to the egg mixture and mix just until they are combined.

Pour the batter into the prepared and bake for 20-25 minutes, until the top springs back when pressed lightly.

Remove from oven and cool completely (in the pan) on a wire rack.

Frost as desired and top with chopped nuts.

Makes 15-20 bars, depending on size.

Wednesday, April 3, 2013

Pottering About

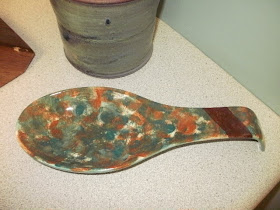
Last week during spring break, Kat, her mom (my daughter T) and I spent an afternoon at Paint, Glaze & Fire Ceramics and Coffee House.

The concept at Paint, Glaze & Fire is fun and simple.  Customers choose and pay for unfinished pottery pieces, then pay an additional small studio fee to paint them there in the shop while also enjoying hot or cold coffee drinks or tea.  The staff then glazes and fires the pieces and they're ready to pick up a few days later. 

I remember doing a little ceramic work as a Girl Scout when I was young, but this was the first time for Kat and T.

I chose a spoon rest to paint, largely because I broke my old ceramic spoon rest a few months ago and I needed a new one.  I think my sponge-painting technique leaves a lot of room for improvement, but the colors - a deep sea green, browns and tans -- are spot on for my kitchen.


Kat chose a couple of 5-inch tiles to do free-form coasters.  Doctor Who fans will recognize her rendition of the Tardis, and the muffin (if I'm not mistaken) represents some aspect of the My Little Pony cartoons and toys.


I liked T's oversized coffee mug the best.  The drizzle effect was another experimental technique that turned out great, in my opinion.  The colors chooses were shades of purple and teal on a cream colored background.


We had lots of fun that afternoon, and I plan on returning and trying something completely different next time.  The shop also features a comfortable lounge area and free wi-fi, as well as classes, parties and even a summer ceramics camp.  If you're local to the Kansas City area, you should check it out and have some creative fun!

Monday, April 1, 2013

Settling Back In

We had a very nice spring break last week, but whew! -- I'm glad to get back to some usual routines this week.  Kat is back to school, Shane is working out of town 4 days a week, which has become almost "normal" for us, and winter appears to finally be settling down into spring.  Here are a few highlights from the weekend:

Kat was with her mom and step-dad for the weekend, and they took in a special Doctor Who event at a local theater.

Kat, my son-in-law M, and friends.

Meanwhile, Shane did some work on our back deck - by himself on Saturday and with my dad's help on Sunday.  The condensed story is that we had a deck, we removed the railings to put up a sun room.  We decided against the sun room in favor of building a larger deck, then we decided against the idea of a larger deck and in favor of just putting the railings back up. 

Of course, the original railings were long gone, we we had to buy new lumber.   We used some extra fence pickets to put a privacy wall at one end of the deck.  We'll be the first to admit our own yard is pretty junky looking right now, but our neighbor's yard on that side is a real eyesore with a shed that is falling in on itself and a trampoline that is hanging in shreds.  We'd rather not see it, and we'd rather not have their dog go into a barking frenzy every time we step out onto the deck, so the privacy wall helps with both of those issues.  Looks pretty nice, too, if you ask me.


Our deck is a tall one, 6-7 feet above ground level, so we still need to buy siding of some sort to underskirt it, and of course we need to stain and seal the new lumber, but this is a nice start.

While the guys worked on the deck, I managed to fix breakfast for us, do several loads of laundry, and prep and plant one of the raised beds with snow peas and onions.  We ended the weekend with a nice meal out with my dad and some friends.

I have a full week planned.  I plan to back outside to plant more of our raised beds, make a batch of soap, complete my menu plan for April, return to my M-W-F blogging schedule, and possibly start my next craft project.

What is on your schedule for this week?