Showing posts with label Cooking. Show all posts

Monday, May 13, 2013

Unfortunate Weekend Events and A Week of Ham

Our weekend didn't turn out at all like we expected.  We had planned a nice visit here at home with my sister and brother-in-law on Saturday afternoon, with them staying overnight in the RV, then on Sunday we were going to join up with my niece and her family, as well as my daughter and son-in-law and spend the day at the zoo.

Instead, shortly after they arrived, my brother-in-law fell ill with some episodes of dangerously low blood pressure and he and sis spent the entire weekend in the hospital, with us making a few trips back and forth ourselves.  My BIL is 68, and has a known serious heart problem, but they ruled that out as the cause right away.  He is also diabetic and I think they have determined that some late and missed meals on Friday and Saturday, as well as some late medication, were the main reason his blood pressure was plummeting.  His blood pressure has since stabilized and he should be released today after one more precautionary test on his heart.

Because of the sudden change in plans, I have a ton of food in the house.  In anticipation of our weekend, I had baked a large spaghetti casserole for our meal on Saturday, prepped ahead a big pan of breakfast enchiladas, and I had thawed a half ham to cook today.  I also bought several kinds of individual-wrapped snacks that I had planned to take with us into the zoo.  Of course, very little of the prepared food was actually eaten, and I still have that ham to bake today.

I invited my daughter and son-in-law over for supper last night, so that took care of half the spaghetti casserole, and I individually wrapped half the breakfast enchiladas and stuck them in the freezer.  They'll go with us on our first camping trip in two weeks, along with the pre-packaged snacks.

Here's what I plan to do with the ham:

Monday:  Baked ham, mashed potatoes, peas and carrots, asparagus, rolls.

Tuesday:  Ham with parsley sauce, boiled potatoes, green beans, salad.

(source)

Wednesday:  The rest of the Baked spaghetti casserole, garlic toast, salad, home-canned peaches.


(source)

Thursday:  All-American Ham and Cheese Roll, potato cakes, corn, asparagus.

(source)

Friday:  Hawaiian Ham Quesadillas, tater tots, salad.

(source)

Saturday:  Ham and shrimp pasta, garlic toast, salad.

Monday, March 25, 2013

Last Minute Meal Planning

This coming week is spring break for Kat.  We were supposed to be on a mini-vacation out of town all week, but more snowy weather and a work situation changed those plans for us.  I can't get outside to work in the garden, either, so I thought this week might provide a good opportunity for me to publish a few posts to this neglected ol' blog of mine.

These changes in plans have thrown a monkey wrench into meal planning.  Thinking we'd be out of town, I had nothing planned for our suppers this week.  We have to eat, and fortunately, we're stocked up on just about everything, so here's what I came up in a hurry:

Sunday:  Balsamic venison roast, mashed potatoes, peas, green beans, coconut cake.

Monday:  Lasagna, garlic toast, corn, lettuce and spinach salad, coconut cake.

Tuesday:  Bratwursts, potatoes au gratin, sauteed Swiss chard, green beans, coconut cake.

Wednesday:  Leftovers from the three previous meals.

Thursday:  Barbecue chicken kabobs with spicy bacon rub, potato salad, steamed cabbage, green beans.

Friday:  Fried fish (spoonbill), homemade french fries (recipe to come), coleslaw, home-canned peaches.

Saturday:  Kung pao pork tacos, lettuce salad, home-canned peaches (although we have tentative plans to go out with friends instead)


What's on your menu this week?

And by the way...today is our 13th wedding anniversary.  We decided to go out last Friday night instead of tonight.  We even splurged a little...after all, we're worth it.


Wednesday, March 13, 2013

2-Ingredient Lentil Soup

Here's another "real food" soup that only has two ingredients (not counting water), but packs LOTS of flavor.

I used some ham stock that I had previously cooked and canned, but you could start from scratch with a meaty ham bone or some ham hocks, along with some water, to make your stock.   If you do that, you'll also have bits of ham to add to your soup.

If the ham was flavorful, the stock will be, too, and you may not even have to add additional seasoning.

Real Food Lentil Soup


2-Ingredient Lentil Soup

2 cups ham stock, preferably homemade
1 cup water
1 cup brown lentils, rinsed

Combine all in a medium pot.  Heat to a boil over high heat, then reduce heat to a simmer or slow boil.

Cook for 1 hour or until lentils are tender.

If desired, mash lentils lightly to thicken soup, then serve.

Makes 4 side dish servings, or 2 generous main dish servings.

Wednesday, March 6, 2013

Ham and Potato Soup: Quick and Simple Real Food

Get ready for this.  A flavorful soup with just two ingredients (okay, three if you count the water), that's good for you (mmm...that bone broth), and can be done in just less than an hour (really). 

If you like, add a little cream, sour cream, or cream cheese to finish.  Sprinkle the top with green onions, shredded cheddar, croutons or freshly ground black pepper.  Make it your own.  Or stop right here with just the two ingredients.  That's what I'm doing today.  Keeping it real.

If you don't have a pressure cooker, feel free to cook this for several hours in a slow cooker or a covered pot in a low oven.  You'll get great results, just not quick ones.  Keep this recipe in mind for the leftovers of your after-Easter ham.


Quick and Easy Pressure-Cooked Ham and Potato Soup


1 pound ham hocks (or a large, meaty leftover ham bone)
2 pounds (more or less) potatoes

Place rack in bottom of pressure cooker per manufacturer's instructions.  Place ham hocks or ham bone on rack.

Add about 2 cups of water to cooker, place lid on and heat over high heat until steady stream pours out of valve.

Place weight on valve.   Once weight begins hissing or rattling (will depend on your particular cooker) reduce heat just enough to keep weight hissing or rattling.  Begin timer and cook for 45 minutes. 

Meanwhile, peel potatoes and cut in to cubes of approximately 1 inch.  Keep potatoes covered with water until ham has finished cooking.

Remove cooker to sink and reduce pressure by running cold water over cooker.  Carefully remove lid and set aside.  Spoon out ham hocks with a slotted spoon and set aside.

Drain potatoes and add to liquid in pot.  Add about 1/2 cup additional water.  Replace lid and return to high heat on the stove.

When a steady stream of steam is coming from valve, replace weight.  When hissing or rocking begins, adjust heat as before and begin timer to cook for 6 minutes.

Meanwhile, pick ham from bones and set aside.  Discard bones or save to make more stock.

After potatoes have cooked for 6 minutes, remove from heat and reduce pressure using cold water method.  Carefully remove lid.

Using tongs, carefully remove rack from pot.  Add ham pieces to pot and stir vigorously to break up some of the potatoes to thicken the soup.  Transfer soup to serving bowl or tureen and serve.

Makes about 4 servings.

Monday, February 18, 2013

Chickens On The Table - Chickens Off The Table

On the table...

The 30-Year Old Cooking Virgin's Skillet Basil Cream Chicken on Valentine's Day, Paula Deen's Southern Fried Chicken on Friday, and Deep South Dish's Chicken and Dumpling Bake Casserole on Sunday.

Paula's recipe...my kitchen...


Off the table...

The idea of keeping laying hens in our backyard.  We've been thinking about it for three years and keep putting it off, mostly because Shane has fairly frequent out-of-town work.  I'm just not willing to make a chicken commitment at this time without him home steadily.  Maybe someday, but not right now. 


Monday, February 4, 2013

Homemade Fortune Cookies

Chinese New Year is Sunday, February 10.  This week will feature three Asian-style recipes you can make this weekend.

*********

Admit it.  The fortune cookies you get at the end of your Chinese restaurant meal aren't all that tasty.  If you're lucky, they taste like vanilla cardboard.  And if you're not so lucky, well, they're just...bad.  The good news is that they aren't very hard to make at home.  It's just a quick batter, baked and wrapped around hand-written fortunes or silly sayings.


Fortune cookies, while not complicated, can be just a little tricky to make.  Here are a few tips:
  • I found that using parchment paper for these works better than a silicone mat, a greased pan or a pan lined with foil. 
  • Tilting the pan in a circular motion seems to work better than trying to spread the batter with the back of a spoon.
  • Wearing cotton or silicone gloves makes it easier to handle and shape the hot cookies. 
  • Setting the folded cookies in the cups of a muffin tin will help them to hold their shape until the cool and become firm. 
  • You may want to make two batches, because you'll finally get the hang of shaping these by the end of the first batch.
Begin by writing fortunes on 3-1/2 inch by  x 1/2 inch strips of paper, then follow the recipe.


Homemade Fortune Cookies

2 large egg whites
1/2 teaspoon vanilla extract
1/2 teaspoon almond extract
3 tablespoons oil of choice (something with neutral flavor)
1/2 cup flour (probably best to use white flour in these)
1-1/2 teaspoons cornstarch
1/4 teaspoon salt
1/2 cup granulated sugar
3 teaspoons water

Heat oven to 300°F. Line two baking sheets with parchment paper.

In a medium bowl, lightly beat the egg white, vanilla and almond extracts, and oil until frothy, but not stiff.

In a separate boil the flour, cornstarch, salt and sugar. Stir the water into the flour mixture.

Add the flour and water mixture into the egg white mixture and stir until you have a smooth batter. The batter should not be runny, but should pour or drop easily off a wooden spoon.

Place level tablespoons of batter onto the lined cookie sheet, spacing them at least 3 inches apart. Gently tilt the baking sheet in a circular motion so that each tablespoon of batter forms a 4-inch circle.

Bake until the outer edges of each cookie turns golden brown and they are easy to remove from the baking sheet with a spatula (14 - 15 minutes).  

Working quickly, remove the cookie with a spatula and flip it over in your hand*. Place a fortune in the middle of a cookie. To form the fortune cookie, fold the cookie in half, then gently pull the edges downward over the rim of a glass, wooden spoon or the edge of a muffin tin. Place the finished cookie in the cup of the muffin tin until cooled.

Continue with the rest of the cookies and batter.

Makes 9-12 fortune cookies.

* Flipping and placing the fortune on the side that was touching the pan results in a better looking cookie, IMO.

Monday, November 26, 2012

Monday Meal Plan

I haven't done a weekly dinner menu on the blog in a long time, so I thought I'd do that this morning.  All the turkey leftovers are gone, and I now have several jars of canned turkey stock in the pantry for future meals.  It's time to start eating some of the venison and pork in our freezer.


Sunday:  Copycat of Macaroni Grill's Penne Rustica. 

This was actually a leftover makeover, but not from Thanksgiving.  We went out last Wednesday night for a belated birthday dinner for Shane.  Without getting into much detail, we were all disappointed with our meals from a well-known chain steak house.  Kat ordered a Parmesan-crusted chicken dish, but brought most of it home as leftovers, which eventually found their way into this dinner. 

I made a few changes to the recipe.  I subbed in a cup of turkey stock for a cup of the cream (and used half-and-half instead of cream to begin with), I added quite a bit more garlic, and omitted the shrimp since we didn't have any in the freezer.  This turned out to be a nice baked pasta dish and quite the improvement over the original chicken dish from the restaurant.  We served it with a green salad and bacon-cheddar scones.

Monday:  Venison chili with corn chips, sour cream and shredded cheddar; peanut butter sandwiches; celery/carrot sticks. 

I call this one of my school lunch dinners, because we always had peanut butter sandwiches and celery/carrot sticks at school whenever we had chili.  I need to get a chili recipe posted on the blog.  My chili used to be ultra-simple:  ground meat, tomato soup, packaged chili seasoning, chili beans.  Lately, though, I've been using tomato sauce and pinto beans grown and canned from our garden, as well as chili seasoning I put together myself.  I need to get those changes on paper -- or on blog, as it were.

Tuesday:  Pork Chops with Onion-Mushroom Gravy

Here's another recipe that used both canned soup and dry soup mix, but that I've changed to include homemade versions instead.  I should probably get those changes recorded, too.  This dish will be served with potatoes and Brussels sprouts, but I haven't yet decided on the recipes for those.

Wednesday:  Texas Chili Cheese Bake

This is a fun dish using leftover chili layered over toast and shredded cheese, then broiled quickly to heat it through.  We'll probably have leftover Brussels sprouts and some home-canned peaches or apples to go with it.

Thursday:  Chinese Steamed Pork Dumplings, Egg Drop Soup, Garlic Green Beans, Almond Cookies

I'll be trying my hand at Chinese steamed dumplings.  If they turn out alright, I'll post the recipe.

Friday:  Kansas City Steak Soup with Venison, Cornbread, Home-canned Fruit

This is a family favorite but I'm trying something new this time:  I'm going to make a HUGE batch and pressure can it.  I've done a lot of pressure canning this year (pinto beans, green beans, chicken stock, even fish), but it will be my first time canning something like this with so many ingredients.  I can't wait to try it!


Saturday:  C.O.R.N. (Clean Out Refrigerator Night)

In other words, I'm taking a night off!

Thursday, August 2, 2012

"Accidental" Cajun Chili

While I can eat chili any time of the year, it wasn't what I had set out to make for supper last Saturday.  My original intent was to make a Cajun Beans and Rice dish.  But after adding this, subbing that, and adding a few other things, I came up with something much more like chili.

I was with it enough to actually write down what I was doing so I can share this with you -- and make it again sometime.  Kat wasn't here to give it a try, but Shane and I really enjoyed it, regardless of it being the "wrong" time of year for chili.

If you don't like okra, try adding fresh or frozen chopped spinach.  If you don't have quinoa, use rice instead.  Feel free to make your own changes and make this recipe your own!

Cajun-Style Chili


Annie's Cajun Chili

1 pound pork breakfast sausage
1 medium onion, diced
1 large bell pepper, diced
3 cloves garlic
1 pint (or 15 oz. can) black-eyed peas with liquid
2 pints water
2 large tomatoes, diced
1 teaspoons each of oregano and thyme
2 teaspoons low-sodium Old Bay Seasoning
1 teaspoon each celery salt and celery seed
1/2 cup chili sauce
1/2 pound frozen okra
1/4 teaspoon black pepper
1/3 cup dry quinoa

In a large stock pot or Dutch oven, crumble and fry pork sausage with onion, bell pepper and garlic. Cook until sausage is no longer pink.  Drain fat from mixture, leaving a tablespoon or so of fat in the pan for flavor.

Stir in all remaining ingredients and bring mixture to a boil.  Reduce heat to a simmer and cook until quinoa is tender and about half of liquid is absorbed.  Serve immediately or cover and let simmer for an hour or more to further develop flavors.

Serve with desired chili fixings such as cheese, sour cream, crackers, tortilla chips, etc.

Makes 4-6 servings.

Monday, July 30, 2012

Make Your Own Garlic Powder (Granulated Garlic)

If stored properly, heads of garlic can last a good, long time, possibly from one season to the next.  This is the situation we found ourselves in this year.  We still had several heads of garlic in the basement, with  fresh garlic ready to bring in.  I decided it was time to turn the older garlic into garlic powder, sometimes also known as granulated garlic.

The first thing I did was peel the papery film off the garlic and separate the cloves.  Because this was last years harvest, some of the cloves were too dry and crumbly to work with, so I composted those.  Some were a little dry, but still flexible (like a raisin) and good-smelling, so I saved those.  The rest seemed fresh, considering their age, and I used those as well.

I peeled the skins off each clove and, except for the very smallest of cloves, I sliced them about 1/16 inch thick.  I spread them out on the "fruit leather" tray of our dehydrator and set it on the high setting.  Oddly enough, it was the pieces that were already leathery that took the longest to dry; the fresher pieces dried right away.  I suspect it had something to do with a change in the sugar content, but I'm not sure.  It took 2-1/2 days for all of it to dry to a brittle stage.

Garlic pieces in the dehydrator

I didn't bother to measure or weigh anything before I started, but I didn't think to measure the dehydrated pieces.  A tray of garlic measured to just under a cup of dehydrated bits.

Blending dehydrated garlic to make garlic powder

I put all of the pieces in our blender and blended them on high for about three minutes or until they were thoroughly pulverized.  The resulting powder measured right at 1/2 cup.

Make Your Own Garlic Powder

I stored the powder in an airtight container in my spice cabinet, and will use it just like I would any store-bought garlic powder.

Thursday, June 21, 2012

12-Pounder

We finally harvested the cabbage growing in Kat's garden bed.  It grew from a seedling she brought home from school earlier this spring and ultimately weighed in at 12 pounds.

Kat thought it was fun to grow, but she doesn't like to eat cabbage, so she's given me permission to do whatever I want with it.  I plan to make part of it into lacto-fermented kraut, if I can find enough containers.  I don't have a crock, so I guess I'll be making it in gallon jars.

I wondered about pressure canning it plain (not as kraut).  I've read about a few people doing it, but it's not listed as safe by any of the reputable sources (Ball, Kerr, university extension sites, etc.), so instead, I'll blanch and freeze whatever portion doesn't become kraut.  Little, if any, will be made into coleslaw since that isn't a favorite here.


Wednesday, June 20, 2012

Fried Pizza. Oh Yes, I Did.

Lest you think I'm only into healthy, cultured food around here, allow me to present this:

fried calzone, fried pizza
Serve with a nice veggie salad to assuage some of the guilt.

There might be a law against it, taking a perfectly good homemade calzone and dunking it in boiling oil.  Oh well, I've always been a bender of rules and a questioner of authority.  Besides, something this yummy is a guaranteed "Get Out of Jail Free" card.

fried calzones, fried pizza
This ain't your ordinary pizza roll.

These are not complicated, but they are time consuming and oh, so worth it.  Use any of your favorite pizza toppings. The one in the picture is filled with shredded mozzarella, sauteed mushrooms, and chunks of smoked sausage, with just enough homemade pizza sauce to hold it all together.  I also made some without the mushrooms, and some that were just cheese and sauce.  Everybody walked away happy -- and full.


Deep Fried Pizza (Fried Calzones)

1 cup mozzarella cheese, shredded
4 ounces diced mushrooms (your favorite), sauteed in a little butter
8 ounces smoked sausage, diced
12 or 16 ounce jar pizza sauce (or make this one from my old blog.) Use the leftovers for a dipping sauce.
1 recipe No-Rise Pizza Crust  (see recipe below)
Oil for deep frying (I prefer peanut oil)

Combine cheese, mushrooms and smoked sausage in a medium bowl.  Add just enough pizza sauce to moisten ingredients so they will hold together.  Set aside.

Mix up one recipe of No-Rise Pizza Crust (recipe below).  You will be working with this dough long enough that it WILL rise, but that's what you want to happen.

If using an electric deep fryer, begin heating oil now.  Heat to 375°F.  If using a Dutch oven on the stove, wait until after calzones are filled to beginning heating oil.

Divide dough into 16 equal portions.  Keep pieces of dough covered with a damp cloth or paper towel until ready to use.

Roll each piece into a circle about 6 inches in diameter, or into an oval or rectangle about 4 inches wide and 8 inches long.  Making different shapes can help you distinguish one type of filling from another.

Spoon abought 1/4 cup filling onto dough.  Moisten edges of dough with water, fold crust over, then pinch together to seal.  Do NOT cut any vents in calzones.

When oil has reached 375°F, carefully fry the calzones in oil, one or two at a time, until calzone floats and turns deep golden brown.  Drain on absorbent paper or cloth.  Repeat until all calzones have been fried.

Makes approximately 8 servings of 2 calzones each.


No-Rise Pizza Crust

3 cups flour (I used a 50/50 mix of white and whole wheat)
1 Tablespoon sugar
2 Tablespoons yeast
1 teaspoon salt
2 Tablespoons olive oil
1 cup warm water

Combine flour, sugar, yeast and salt in large mixing bowl.  Add oil and water.  Mix, using  wooden spoon or your hand, until a stiff dough forms.  Add additional water, 1 Tablespoon at a time, if needed to get dough to form a ball.  Let sit 5 minutes.  Shape into one deep dish pizza crust or 2 thin pizza crusts in a pan or on a pizza stone.  Perforate crust(s) several times with a fork.  Pre-bake at 400°F for about 5 minutes or until dough just barely begins to form a crust.  Remove from oven and top with your favorite pizza toppings.  Return to oven and bake 15-20 minutes or until cheese has melted and browned and crust is golden on bottom.

Monday, June 11, 2012

How To Make Dairy Kefir

In my slow, but ongoing, series of posts about fermented foods, today I want to write about milk kefir (pronounced keh-FEAR, or sometimes KEE-fur).  Of the three fermented drinks we currently make and drink (kombucha, water kefir and dairy kefir), this is my favorite.

For anyone who is not familiar with milk kefir, also called dairy kefir or just kefir, it is a cultured (fermented) food item similar to a thin yogurt or buttermilk. It is full of probiotics and, at least to me, is quite tasty.  I think it is milder in flavor than homemade yogurt and find it much easier to make.  It is a good substitute in any recipe that calls for buttermilk, and can even replace sweet milk in many recipes.  If fermented a second time, usually with some kind of flavoring, it becomes slightly effervescent and even tastier, in my opinion.  Best of all, it can also be used to make some great treats.

To begin, you must have a starter, which is usually called kefir grains.  The starter is also known as kefir pearls, kefir scoby, as well as by a variety of other names.  The starter does not come from grain at all, but rather from a combination of yeasts and (beneficial) bacteria.  When dehydrated, it looks like small granules (thus the name). Re-hydrated, it resembles cauliflower, but with a spongy texture. 
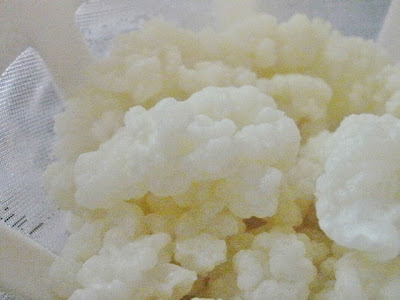
kefir culture
Kefir culture (starter).

A nice lady on craigslist gave me my starter, but you can also find them for sale on a number of websites.  If you are local to me and are interested, I can probably set you up with a starter as these things tend to reproduce with each batch of kefir.

Once you've acquired a starter, you combine it in a clean glass vessel (canning jars are good) with fresh milk.  I've read that raw is best, but I've yet to get my hands on any, so I use regular (NOT ultra-pasteurized) whole milk.  I suppose you can use milk with a lower fat content, but I think whole milk is recommended.  The ratio is 1 tablespoon of starter grains to 1 cup of milk.  I usually make several cups at a time, either in multiple jars or in a gallon glass jar.

kefir
Starter in the jars and ready for milk.

Milk Kefir
Milk.  Not raw or organic, but local.

Once combined, cover your jar with a clean cloth or coffee filter and secure it with a rubber band.  This will keep dust, gnats and the like out of the kefir.  Set the jar on the counter, at room temperature and several feet away from any other cultured foods you have going, and let it sit for 12-24 hours.  You will know it is working when you see small pockets of whey (clear, yellowish fluid) develop both on top and throughout the milk. 
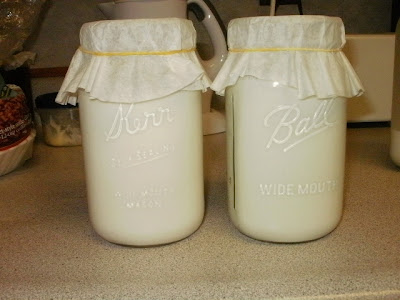
Dairy Kefir
Kefir, ready for the first fermentation.

You'll know it is done when the milk has thickened to the consistency of thin yogurt or buttermilk, and tastes slightly tart.  The longer you let the kefir culture, the more tart it will be.  When it is as tart as you like it, strain the kefir through a plastic strainer or a fine colander to remove the grains.  At this point you can start another batch with the grains.  The liquid kefir is now ready to drink or use in recipes.  Just store it in the fridge in a covered jar to slow the fermentation process.  Better yet, it can be flavored and fermented a second time for added flavor.  It's my understanding that the second fermentation also increases the B vitamin content significantly.

To do a second fermentation, just pour the kefir into clean jars (without any of the grains in it), and cover tightly.  Let sit on the counter for another 12-24 hours (the warmer the room, the less time it will take) or until you see whey forming again, this time at the bottom of the jar.  Once that happens, move the jars to the refrigerator until you are ready to use it.
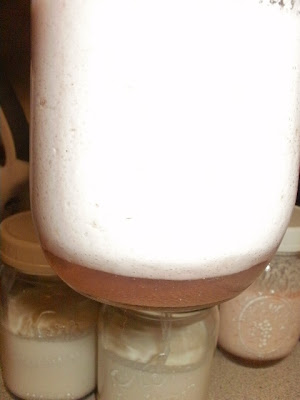
kefir whey
Layer of whey forming under second-fermented kefir.

You can also flavor your kefir for the second fermentation by adding sweeteners or fruit.  Two of my favorites have been pure maple syrup with vanilla, and slices of organic oranges (rind and all) with a little organic sugar.  I've also successfully used crushed and sweetened strawberries, strawberry-rhubarb syrup, vanilla extract with sugar, lemons, limes, and crushed blueberries.  Once the second fermentation is complete, the result is a lightly fizzy, sweet-tart and fruity beverage that, while made with milk, is not heavy at all. 

Second-ferment kefir
Kefir being flavored for a second fermentation.

If you like, you can replace the milk in kefir with coconut milk.  The taste is a lot different, but if you like coconut, it's very pleasant.

I've also used kefir, both single- and double-fermented, to make healthy and yummy ranch dressing.  I just use it to replace the buttermilk in this recipe.

Sometimes, if you let the kefir ferment too long, either during the first or second fermentation, it can separate into defined layers of curd and whey.  If that happens, all is not lost.  The simplest thing to do with it is just stir it back together.  It is not as creamy as it could be, but it is still flavorful and perfectly safe to drink. 

Another option is to strain the whole thing through a plastic mesh strainer, completely separating the curd from the whey.  The whey can be used in baking or for lacto-fermented veggies (recipes to come), and the curd can be used as a cream cheese or sour cream substitute.  The kefir curd (kefir cream) is also an ingredient in this:

kefir ice cream
Chocolate kefir ice cream.

I promise it will be my next cultured food recipe, and I promise you'll love it.

Monday, June 4, 2012

Another Quick Camping Trip

Shane and I decided to take the camper out again, just the two of us, while Kat was with her mom for the weekend.  It's been a few years since we camped without Kat, so we had a nice getaway as a couple.

An upscale housing development (Lakewood, for my local readers) was having community wide garage sales that we didn't want to miss.  We couldn't decide whether to camp or go to sales, so we figured out a way to do both, by camping just a mile away from Lakewood (at Blue Springs Lake).  That's right, we camped just 20-25 miles from home, and for all practical purposes, we were "in the city" the whole time, but as it turned out, this is one of nicest parks we camped in, and we had a very nice time.

A sight I won't often see -- the back of our camper while it's on the road.
Look how dark the sky looks.

Half an hour and 20 miles later, it's bright and clear!


Since we were sans Kat, our meals at camp were a little different this time around.  Any time we don't have her, we make a point of enjoying some of our favorite foods, flavors, and/or ingredients that she doesn't really like.  For example, Friday night we ate this Cajun Shrimp and Grits dish.  It was based on THIS RECIPE.  It doesn't look a thing like the original photo, but it was delicious and perfect for the cooler temperatures here that night.


We had THESE SANDWICHES for breakfast both Saturday and Sunday mornings, but instead of having the eggs on English muffins, we had them on bagel thins one morning and sandwich thins the next.


Our intent for Saturday was to run "home" to the camper for a quick lunch, then head back out for more garage sales, followed by a repeat of the same meal for supper.  What really happened was that we skipped lunch altogether, then had an extreme pig-out once we finally did get back to camp.  Pictured here (or just out of frame) are THIS DIP, along with some commercially-prepared hummus, a veggie tray and meat/cheese tray I put together, pita chips, woven wheat crackers, and sandwich thins.   There was just enough left over that we made a similar lunch yesterday when we came home.


To drink, we enjoyed water, iced tea, beer for Shane, some of the new Michelob Light Cider for me (meh...I was unimpressed), and each morning, coffee.

I tend to take too much food when we camp, but with each trip, I'm getting better at judging how much we will need.  I hope to be spot on by the end of summer.

That should be it for the camping posts for a while.  Our next camp out is reserved for July 4-8.  Unless, of course, we decide to go somewhere sooner.

Wednesday, May 30, 2012

Crockpot Pork and Gravy with Vegetables

Crockpot camping meals


This is another recipe inspired by something our friend John made and served to us.  He makes a dish of sauteed chicken breast chunks served over rice, with zucchini and mushrooms (each sauteed separately) spooned over, and then poultry gravy ladled over all of it.  It's a pretty good meal.

Now, I'll tell you this, because I tell John this too...although he's a he, he's also something of a diva in the kitchen.  He does nearly all of the cooking for his family and he doesn't really like it when I take one of his ideas and make it my own.  But I do it all the time and he just has to deal with it.  So, if you were able to ask him, he'd say the recipe that follows is NOTHING like the one he makes, and not as good, either.  To use John's own words, I have only this to say...

Whatever.

I took his meal and adapted it, not only to the foods I already had on hand, but also to the crockpot, so I could let the meat cook at camp while we were out doing other things.  It could still be served over rice, but we voted for pasta instead.  So, John's right, this isn't much like his original dish.  But I have to give him credit for the idea.

None of us thought we were very hungry the day I made this at camp, but we ended up eating every last bite of it.


Crockpot Pork and Gravy with Veggies

1 pork loin roast (about 2 pounds) cut into 1-inch cubes
2 packets of gravy mix (pork or poultry, either will work) or equal amount of bulk gravy mix
1 small to medium zucchini, sliced into half-moon shapes
1 small to medium onion (I used vidalia), cut into large chunks
1 medium red bell pepper, seeded and cut into chunks
pan spray or a small amount of oil
1 Tablespoon butter
seasoned salt
cooked, drained pasta of your choice

Place pork and a generous amount of water in a smaller crockpot and turn on the HI.  Let meat cook on HI for about 4 hours, or on LO for about 6 hours, or until tender.


When meat is tender, whisk in gravy mix, cover and let thicken.  Ours turned out rather thin, but it still worked just fine.  If you like a thicker gravy, use either less water in the crockpot or more gravy mix.


Meanwhile, saute the chopped veggies in a skillet over medium heat that has been sprayed with pan spray or coated with just a drizzle of oil.  Add a little seasoned salt to taste.  When the veggies start to get a little bit tender, add a Tablespoon of butter to the skillet, increase heat to high, and sautee until veggies begin to brown.


Spoon veggies over cooked pasta and top both the veggies and pasta with some of the pork and gravy mixture.  Serve with fresh fruit and/or bread on the side.

Cowboy Potatoes

Cooking potatoes on the grill


I mentioned in my previous post comments that I learned how to make Cowboy Potatoes by watching our friend John make them.  The method is his, but the measurements are mine.  You can adjust the amounts as you see fit.


Cowboy Potatoes

6 large potatoes, peeled and cut into 1 to 1-1/2 inch chunks
1 medium or large Vidalia or other sweet onion (or any type of onion, really)
1 teaspoon seasoned salt
1 stick butter (yes, 1 whole stick)

Place potato chunks on a piece of foil.  Slice onion into strips and sprinkle those over the potatoes.  Sprinkle potatoes and onions with season salt and then top it all with chunks of butter.


Cover with another sheet of foil and fold the edges over.  You want lots of room in there for steam, thus the two pieces of foil instead of a folded-over packet.


John's charcoal grill method is to like the charcoal, place the packet on the grill while there are still flames, and by the time the coals burn down and are ready for grilling meat, the potatoes can come off the grill.

My gas grill method is to light the grill and set it at a medium flame.  Place the potato packet on the grill and cook for 20 minutes.

Either way, take the packet of potatoes off the grill, but do not open it.  Set it aside while you grill your other meat and/or veggies.  When the rest of your meal is done, open the potato packet.  The potatoes will still be hot, and perfectly done.

Eat them just as they are, or top them with sour cream and shredded cheese.  They are delicious either way.

I haven't made these in the oven yet, but if you want to try them that way, I would suggest 20 minutes at 350F, then let them sit on the counter for 10 minutes before opening the packet.

Tuesday, May 29, 2012

Eating and Drinking at Camp

By now you know I like to cook and that I try to steer my family and myself away from a lot of junk foods and pre-packaged convenience foods.  But camping is supposed to be a mini-vacation, so when we camp, we loosen up on a lot of the "rules" we follow at home by buying, eating and using a lot of things we don't normal buy, eat or use at home.

I don't want to spend my entire trip cooking and washing dishes, so we allow for a few conveniences.  We use paper napkins and paper plates.  Not styrofoam, but actual biodegradable paper.  We eat hot dogs and marshmallows, and drink soda and bottled water.  We've been known to use canned soups and boxed mac-n-cheese when we camp.  These aren't the same standards I try to keep to at home.  Whatever.

This past weekend was no exception, although I would like to point out a few things that I found interesting. 
  • Everything we ate, we ate at camp, meaning we didn't eat any meals out.  We usually eat at least one meal out when we camp, so I consider this a small victory.
  • When we left home, in addition to beer and water, we had three 2-liter bottles of soda and a gallon of homemade iced tea.  By the time we got home, the tea was nearly gone, and we had consumed less than a bottle of the soda.  Our water was about 3/4 gone, and we didn't have any beer left.
  • The homemade cookies I made didn't get touched at all until we got home|
  • In the s'mores department, we still had graham crackers, marshmallows AND chocolate left over.
  • On the other hand, there was only half of one of the three bags of chips left, and the french onion dip was completely gone by the end of the second day. 
  • True confession time:  I just don't like s'mores.  Every camping season I try one, take a bite or two, then pass it on to Kat or Shane.  This year I tried one with dark chocolate, thinking maybe it wouldn't be so sweet.  Nope.  Still couldn't do it. 
  • Thus, I've decided that my ideal s'more would be savory.  The graham crackers would be replaced with saltines, the chocolate replaced with cheese, and the marshmallow replaced with ham.  If that happened, the s'more would be my BFF.
Anyway...we did a little cooking and a lot of eating at camp.  Here are a few pics, and I'll try to post a couple of recipes to follow them up tomorrow or Thursday.

Homemade sugar cookie bars.

Friday night's supper of burgers and dogs.

Oh yes it was!

Sausage rolls for breakfast, but they tasted more like an hors d'oeuvre.

Sauteed zucchini, onion and red pepper to go with....

chunks of pork loin simmered in a slow cooker...

thickened with gravy mix...

and served over whole wheat pasta.  We ate every last bit of it.

These were good.

A breakfast casserole (thanks A.Marie), and pre-made hash brown patties.

Our friend John calls these cowboy potatoes.  Potatoes, Vidalia onions, season salt and butter...

wrapped in foil...

and grilled until tender.  Yum!

Related Posts Plugin for WordPress, Blogger...