Friday, March 29, 2013

March Resolution Review

It's hard to believe that a quarter of the year has already passed.  Time just flies for me lately!

I set some goals at the beginning of the year, so I thought I'd give a quick monthly update on my progress in March. 


Reading: 
  • Goal - 18 Books and more than a year of Mother Earth News and Hobby Farm Home back issues (and yes, I've let the subscriptions to those magazines expire).
  • March Progress - Read 2 books (7 books of 18 total), and 4 of the  magazines (10 magazines of 38 total). 
The books I read were:


Crafting:
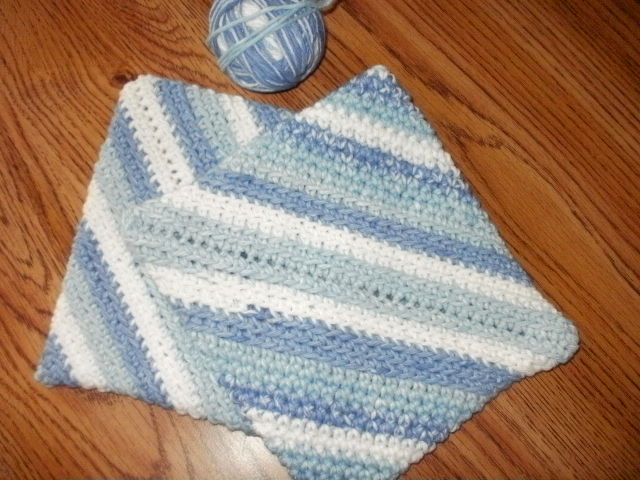
  • Goal - 12 completed projects, preferably one a month, with one being a quilted item and another being knit socks.
  • March Progress - Started and completed the second toe-up knitted sock, completing the pair.  I also crocheted a couple of much needed pot holders using this pattern. ( 3 projects of 12 total)

The socks are far from perfect, but functional and very comfortable.  I love how they match, but aren't identical.  I really enjoyed knitting them and I'm sure I'll knit more in the future.


Gardening: 
  • Goal - Organized planning, leading to an organized garden.
  • March Progress - We finally bought a new printer and I was finally able to print pages from the garden planner I mentioned in earlier posts.  I love it; it's a very functional and attractive planner to use.

    We have begun planting and so far have potatoes and two new gooseberries bushes in the ground.  I transplanted 76 strawberry plants into a new pyramid, the garlic we planted last fall is coming up, as are the perennial asparagus and rhubarb.  We had big plans to continue planting early crops, but last weekend we were hit with our third mega-snowstorm in two months, so planting will have to wait a little longer.

Diet/Nutrition:
  • Goal - To switch over to less harmful types of sweeteners and/or reduce sugars in our foods.  To grow more of our food in our backyard.
  • March Progress - I have decided that the only way for me to do this is to just do it!  Despite the cost difference between plain granulated sugar and organic cane juice crystals, I used up the last bag of white sugar and I've vowed to eliminate it from sugar from our shopping list entirely.  I consider cane juice crystals the next step up on the sweetener hierarchy.  Not the best choice, but a better one.  We also continue to use local honey, molasses (local when possible), Sucanat and real maple syrup as sweeteners, but not with any regularity.


Fitness:
  • Goal - To join a local yoga class better flexibility, balance and overall health.
  • March Progress - I still haven't made any effort to find a different class, but with gardening starting up, I'm not to worried.  Gardening is great exercise!


Finances:
  • Goal - To pay off our RV.
  • March Progress - Shane has been working out of town a lot lately.  He's been getting both a per diem allowance (there is usually a little left over after expenses) and at least a couple of hours of overtime on almost every check lately.   That has helped me to continue to pay extra on each RV payment.  I don't think I'll reach the goal of having it completely paid off this year, but the balance will be reduced considerably.

Thursday, March 28, 2013

Getting Crafty

I was going to write about how my daughter T., Kat, and I went to this really cool combination coffee house and ceramics studio and got all artsy-craftsy earlier today, but I ended up leaving the house without a thought of grabbing our camera, so that post will have to wait until our artwork is ready to pick up in about a week.

Instead, I'm going to tell you about Shane and Kat doing some leather crafting last weekend during the snow storm.

Shane is pretty good at leather-crafting, as you can see in this post from my old blog.  A while back -- maybe a year or so ago -- Kat became interested, so they started a project together.  It's a craft that can take years to perfect, but is actually quite simple to learn in basic form and is suitable for crafters of all ages.

Kat's first project was a tooled tri-fold key wallet.  As so often happens, projects get set aside around here, but they finally picked it back up and finished it last weekend.  Here she and Shane are using a device called a stitching pony to hold the key wallet steady while they stitched the binding.


Here is the interior of the finished wallet...


And here is the exterior.  I don't use her real name on the blog, so it has been electronically erased from the center area there.


Her next project is going to be a belt, with a daffodil pattern. Here she is doing a practice pattern for it on a piece of scrap leather.


I can hardly wait to see how it turns out!

Wednesday, March 27, 2013

How to Make Frozen French Fries at Home


Although they aren't the healthiest of foods, I think just about everyone likes to eat french fries now and then.  Really good fries require cooking not once, but twice, or even three times, to end up fluffy inside and crispy outside.  In other words, making them from fresh potatoes is time consuming, and shoppers often turn to frozen fries from the store instead.

In this post I'll show you how I make homemade fries in bulk to freeze to for future meals.  They are still time-consuming, but I'd rather make up a bunch of them once than to have to go through the whole process every time I want to serve fries.

This method starts out with 10-pounds of unpeeled potatoes.  By the time they are peeled, blanched and par-fried, the result is about 6 pounds of french fries to put in the freezer.


How to Make Frozen French Fries

Equipment:

Very large stock pot (I used my pressure canner without its lid)
Potato peeler or paring knife
Chef's knife or french fry cutting gadget such as this Le Presse - (garage sale, $5)
Cookie sheets and cooling racks
Large strainer or colander
Deep fryer
Plain brown paper bags, parchment paper or paper towels (paper bags work best)
Zippered freezer bags

Ingredients:

10 pounds large baking potatoes (russets or Yukon golds work well)
5 quarts of cold water
1/4 cup sugar
2 to 4 Tablespoons salt (we like to use at least 3 Tablespoons)
Oil for your fryer (we prefer peanut oil for flavor, ease of cleanup and reduced frying odor in the air)

Make brine by placing 5 quarts of water, along with sugar and salt, in large stock pot and stir until sugar and salt dissolve.  (The sugar makes the fries brown better, the salt makes them taste better.) Set pot on burner of stove.

Peel potatoes and using either knife or fry cutter, cut into long fries about 3/8-inch square.  Place fries into brine as you cut them.  Once all potatoes are cut, let sit in brine for about 10 minutes.

Meanwhile, place cooling racks inside cookie sheets.  You'll need several.  I used 4 half-sheet pans. 

Pour peanut oil into fryer per manufacturer's instructions, but do not turn on yet.

Once fries have brined for 10 minutes, turn on heat under the pot to high.  Blanche fries by bringing them just to a boil, removing from heat just as the first big bubbles appear in the center of the pot (there will be small bubbles around the edge before the bigger ones appear).  The goal is to just barely cook the fries.  They should still be quite rigid after they have been blanched.  Place colander in sink and carefully drain potatoes.  If your pot is too large to lift and drain safely, scoop potatoes out into a large bowl using a slotted spoon.

Carefully place blanched fries on cooling racks in cookie sheets.  By the time you have the sheets filled, if you have more potatoes, you can lift the racks off the sheets and place remaining fries onto the sheets.  Once they have cooled this much, they won't stick to the surface.  Allow fries to cool completely.  Set one empty cookie sheet aside.

Fries cooling after being blanched.

Meanwhile, heat oil to 375°F.  Line the cookie sheet you set aside with brown paper, parchment paper or paper towels, and have more liners ready for the other cookie sheets as they become available.

When oil is hot, fry french fries in batches according to your fryer's instructions.  Do not overfill fryer basket (trust me on this).  Fry each batch for exactly 2 minutes.  Lift basket, allow to drain for a couple of minutes, then turn fries out onto cookie sheet lined with paper.  The fries will not be brown, but will have a very light, protective crust on the outside.  If you eat one a this point, it may be close to cooked inside, but will be heavy and waxy instead of light and fluffy.

Fries draining on brown paper after having been fried the first time.

Continue to fry french fries in batches as the previous batches cool.  Drain all of them well on brown paper and allow them to cool completely.  Once cool, no need to flash-freeze.  Just bag them into zipper bags and freeze.

To cook and serve these fries, you can:

1) Heat fryer to 375°F.  Add frozen fries to fryer basket (do not overfill) and carefully lower basket into hot oil.  Fry until golden brown and crispy, 3 to 6 minutes.

2) Heat oven to 425°F.  Place frozen fries in a single layer on a cookie sheet and bake for about 30 minutes or until desired brown crispiness is reached, flipping fries once during the cooking time.

Personally, I think frying is both tastier and quicker, but you decide for yourself.

Finished fries are light and fluffy inside.


So, there you go.  Frozen fries at home.  They're a little bit of work on the front end, but they pay off big when you're ready to serve some burgers or sandwiches on a busy weeknight. 

They're a bargain, too.  Even if you don't have a friend to give you potatoes like I did, you can sometimes find potatoes at the store for as little as $1-$2 for 10 pounds.  So 10 pounds of potatoes become 6 pounds of fries for $2 or less.  A 2-pound bag of store brand french fries is about $1.50, with national brands being even higher.  The amount saved?  Well -- it's no small potatoes.

Tuesday, March 26, 2013

Springtime Coconut Cake

Who's ready for spring?  I know I am.  The calendar says it's here, but there are several inches of fresh snow on the ground that beg to differ.

Enough is enough -- if I can't have spring outside, I'll have it inside with this delicious coconut cake.  It smells and tastes of warm days in the sun.  It's sure to brighten even the snowiest of spring days.


Springtime Coconut Cake

2-1/2 cups all-purpose flour
1 teaspoon baking soda
1 teaspoon salt
1/2 cup shredded coconut (sweetened or unsweetened, your choice)
1 cup buttermilk or soured milk*
2 teaspoons vanilla extract
2 teaspoons coconut extract or flavoring
1/2 cup butter, softened
1/2 cup virgin coconut oil, melted**
2 cups sugar
5 eggs

* make soured milk by placing 2 teaspoons lemon juice or white vinegar in measuring cup and filling with milk to make 1 cup.
** can use an additional 1/2 cup of butter instead of coconut oil, but using virgin coconut oil enhances the coconut flavor of the cake

Heat oven to 350°F.  Lightly grease or spray a 9x13 cake pan.  Set pan aside.

In a large bowl, combine flour, baking soda, salt and shredded coconut.  Mix well, then set aside.

In small bowl, combine buttermilk, vanilla extract and coconut extract.  Set aside.

In separate large bowl, with electric mixer, cream butter and coconut oil with sugar until light and fluffy.  Add eggs, one at a time, mixing well after each egg is added.

In same bowl, alternate between additions of flour mixture and milk mixture until all ingredients have been added and batter is light and fluffy.  Spoon into prepared pan and spread evenly.

Bake at 350°F for 40 minutes or until wooden pick inserted in center comes out clean.  Remove from oven and place cake, in pan, on cooling rack.  Cool completely.

Frost with coconut butter cream frosting (below).  Sprinkle cake with additional shredded coconut and decorate with pastel jelly beans if desired.

(If you prefer to make a 2-layer cake, spread batter into two prepared round cake pans.  Bake as above, but begin checking cakes after 30 minutes in the oven.)


Buttercream Frosting

1 cup (2 sticks) butter, softened*
1 teaspoon vanilla extract
2 teaspoons coconut extract or flavoring
4 cups powdered sugar, preferably sifted
2-3 Tablespoons milk

Combine butter, extracts and powdered sugar until combined and smooth.  Add milk gradually until desired consistency is reached.

Makes about 3 cups of frosting.


*This makes an "off-white" or light creamy yellow frosting.  I do not use vegetable shortening in my cooking or baking, but if you prefer a whiter frosting, you may substitute 1/2 cup of shortening for 1/2 cup of the the butter.

Monday, March 25, 2013

Last Minute Meal Planning

This coming week is spring break for Kat.  We were supposed to be on a mini-vacation out of town all week, but more snowy weather and a work situation changed those plans for us.  I can't get outside to work in the garden, either, so I thought this week might provide a good opportunity for me to publish a few posts to this neglected ol' blog of mine.

These changes in plans have thrown a monkey wrench into meal planning.  Thinking we'd be out of town, I had nothing planned for our suppers this week.  We have to eat, and fortunately, we're stocked up on just about everything, so here's what I came up in a hurry:

Sunday:  Balsamic venison roast, mashed potatoes, peas, green beans, coconut cake.

Monday:  Lasagna, garlic toast, corn, lettuce and spinach salad, coconut cake.

Tuesday:  Bratwursts, potatoes au gratin, sauteed Swiss chard, green beans, coconut cake.

Wednesday:  Leftovers from the three previous meals.

Thursday:  Barbecue chicken kabobs with spicy bacon rub, potato salad, steamed cabbage, green beans.

Friday:  Fried fish (spoonbill), homemade french fries (recipe to come), coleslaw, home-canned peaches.

Saturday:  Kung pao pork tacos, lettuce salad, home-canned peaches (although we have tentative plans to go out with friends instead)


What's on your menu this week?

And by the way...today is our 13th wedding anniversary.  We decided to go out last Friday night instead of tonight.  We even splurged a little...after all, we're worth it.


Monday, March 18, 2013

Ready, Set, Garden!

Gardening has begun at Haphazard Homestead!

I now have a new printer and have begun using the garden planner I purchased earlier this year.  I have mapped out our garden on grid paper, but I also like mapping it on an aerial photo (this one's from Google Earth) and pasting it into a drawing program to add the ground features.  It just gives us a more realistic perspective, I think.  All the white boxes or lines are our planting areas, both raised and in-ground beds.  If they aren't labeled, they are still empty.  It should also go without saying that the beds are absolutely not-to-scale.


Shane and I have been simultaneously planning on paper and planting in soil.  So far, we have planted a largish potato patch, two new gooseberry bushes, as well as transplanting about 75 strawberry plants to a new pyramid.

While I'll try not to neglect the blog entirely, you can expect that posting will be more erratic for a while. I apologize in advance for absences that are sure to happen, and will post if/when spare moments and inspiration coincide.

Wednesday, March 13, 2013

2-Ingredient Lentil Soup

Here's another "real food" soup that only has two ingredients (not counting water), but packs LOTS of flavor.

I used some ham stock that I had previously cooked and canned, but you could start from scratch with a meaty ham bone or some ham hocks, along with some water, to make your stock.   If you do that, you'll also have bits of ham to add to your soup.

If the ham was flavorful, the stock will be, too, and you may not even have to add additional seasoning.

Real Food Lentil Soup


2-Ingredient Lentil Soup

2 cups ham stock, preferably homemade
1 cup water
1 cup brown lentils, rinsed

Combine all in a medium pot.  Heat to a boil over high heat, then reduce heat to a simmer or slow boil.

Cook for 1 hour or until lentils are tender.

If desired, mash lentils lightly to thicken soup, then serve.

Makes 4 side dish servings, or 2 generous main dish servings.

Friday, March 8, 2013

Dehydrating Potatoes

My friend Melinda and her husband gave us a boatload of potatoes recently, and I've been slowly working them up.  Some will be chitted and planted in our garden, some canned, and some dehydrated, and of course some eaten fresh.

This week I've been dehydrating.  The process takes a little time, but isn't difficult.  I learned the basics from this post at Hickery Holler.

First I scrubbed and peeled about five pounds of potatoes.  I sliced them into a bath of about three quarts cold water and 3/4 teaspoon of citric acid.  This will help keep them from turning brown or grey from oxidation.  I am pretty fast with a knife, so that's how I cut mine, but you could use a food processor or mandolin.

As I was slicing them, I was also heating a large pot of water to a full boil.  In batches, I blanched the sliced potatoes in the boiling water for four minutes.

Using a slotted spoon, I removed the slices from the boiling water and returned them to the cool water and citric acid bath.  I made a new bath each time, using 1/4 teaspoon citric acid to each quart of cold water, because the water needs to be cold to stop the blanching process.

I then drained the slices and placed them in a single layer on the trays of our dehydrator.


I would like to one day have an Excalibur dehydrator, but for now we have a basic Ronco with ten round trays.  The five pounds of potatoes filled all ten trays perfectly.


I set the dehydrator on high (in this case, that means heat AND fan), and rotated the bottom tray to the top each hour.  Rotation isn't strictly necessary, but I feel it speeds up and evens the drying.  All of the slices were dry after eight hours.  Had they been sliced uniformly thin, they may have dried mopre quickly.


Five pounds of dehydrated potato slices fit perfectly into two quart canning jars.  I have ordered some oxygen absorbing packets and will put a couple in each jar to seal them.  Properly stored, these potatoes could be kept safely for years.


The next, I decided to make dehydrated hash browns.  I used the same basic process as above:  Wash, peel, shred with food processor, soak in citric acid bath for a few minutes, blanch for four minutes, shock in another citric acid bath.  I added a couple of steps by rinsing the shreds with cold water to remove some of the starch and wringing them in a clean cloth napkin to squeeze out most of the water.  Then I spread them on the dehydrator trays. 

Some of the shreds fell through the mesh of the trays, but that was really no worry, as the heating element is enclosed and doesn't get hot enough to burn food anyway. There are small-mesh mats available for the trays that would keep this from happening, and would also make clean-up easier for other (stickier) foods, so I may end up getting those in the future.

With shreds, five pounds filled up seven trays, which tells me I probably could've made the layers thinner in each tray so they would dry more quickly.  In the end, they filled two quart jars after six hours of drying time.

Dehydrated Shredded Potatoes


Overall, this was an easy way to preserve our potato bounty, and one that's a space-saver, too.  I'm looking forward to trying recipes made with these potatoes, and I'll be sure to post them when I do.

Wednesday, March 6, 2013

Ham and Potato Soup: Quick and Simple Real Food

Get ready for this.  A flavorful soup with just two ingredients (okay, three if you count the water), that's good for you (mmm...that bone broth), and can be done in just less than an hour (really). 

If you like, add a little cream, sour cream, or cream cheese to finish.  Sprinkle the top with green onions, shredded cheddar, croutons or freshly ground black pepper.  Make it your own.  Or stop right here with just the two ingredients.  That's what I'm doing today.  Keeping it real.

If you don't have a pressure cooker, feel free to cook this for several hours in a slow cooker or a covered pot in a low oven.  You'll get great results, just not quick ones.  Keep this recipe in mind for the leftovers of your after-Easter ham.


Quick and Easy Pressure-Cooked Ham and Potato Soup


1 pound ham hocks (or a large, meaty leftover ham bone)
2 pounds (more or less) potatoes

Place rack in bottom of pressure cooker per manufacturer's instructions.  Place ham hocks or ham bone on rack.

Add about 2 cups of water to cooker, place lid on and heat over high heat until steady stream pours out of valve.

Place weight on valve.   Once weight begins hissing or rattling (will depend on your particular cooker) reduce heat just enough to keep weight hissing or rattling.  Begin timer and cook for 45 minutes. 

Meanwhile, peel potatoes and cut in to cubes of approximately 1 inch.  Keep potatoes covered with water until ham has finished cooking.

Remove cooker to sink and reduce pressure by running cold water over cooker.  Carefully remove lid and set aside.  Spoon out ham hocks with a slotted spoon and set aside.

Drain potatoes and add to liquid in pot.  Add about 1/2 cup additional water.  Replace lid and return to high heat on the stove.

When a steady stream of steam is coming from valve, replace weight.  When hissing or rocking begins, adjust heat as before and begin timer to cook for 6 minutes.

Meanwhile, pick ham from bones and set aside.  Discard bones or save to make more stock.

After potatoes have cooked for 6 minutes, remove from heat and reduce pressure using cold water method.  Carefully remove lid.

Using tongs, carefully remove rack from pot.  Add ham pieces to pot and stir vigorously to break up some of the potatoes to thicken the soup.  Transfer soup to serving bowl or tureen and serve.

Makes about 4 servings.

Monday, March 4, 2013

Super Simple Ham and Egg Skillet

I threw this together from leftovers one morning last week.  I liked it so well, I'll be making it on purpose next time.


Super Simple Ham and Egg Skillet


For each serving:

1/2 cup chopped cooked ham
1/2 to 3/4 cup cooked grain  -- I had farro, but you could use rice, wheat berries, steel cut oats, etc.
1/4 to 1/2 cup shredded cheese of choice
1 teaspoon butter
1 slice (ring-shaped) green bell pepper
1 egg
salt and pepper to taste

In a small skillet, cook chopped ham and cooked grain over medium-high heat until ham begins to brown and mixture is heated through.  Spoon onto serving plate, sprinkle with half of cheese,  and cover with clean towel to keep warm.

In same skillet melt butter over medium heat.  Place pepper ring in pan and let cook for about 1 minute. 

Break egg into center of pepper ring in skillet.  Cook egg until done to taste.  Carefully transfer egg and pepper ring to top of grain and ham mixture.  Sprinkle with salt, pepper and remaining cheese as desired. 

Serve immediately.


Related Posts Plugin for WordPress, Blogger...