Showing posts with label Fermenting. Show all posts

Monday, July 16, 2012

Lacto-Fermented Salsa - Two Ways

Our tomatoes are finally coming in, so this week I'll be focusing on a variety of tomato-y condiments.  Here are a couple of different flavors of lacto-fermented salsa.  Keep in mind that L-F salsa is preserved with salt or a salty brine --it's what makes lacto-fermentation work -- so it will taste saltier than many other salsas.  You can offset that by serving it with low-sodium tortilla chips and/or reducing the salt in the Mexican or Tex-Mex dishes that you'll be topping with the salsa.

If you have more salsa than will easily fit into your jars, it can be eaten the day you make it.  However, the flavors will blend and mellow the longer it is stored.


salsa, lacto fermented salsa, tomatoes


Annie's Basic Lacto-Fermented Tomato Salsa

4 cups of diced tomatoes (no need to peel)
1/2 cup diced onion
1/4 cup diced green bell pepper
3 cloves garlic, minced
4 Tablespoons whey
2 Tablespoons fresh lime juice
1 Tablespoon sea salt
2 teaspoons finely chopped cilantro (optional)
1 teaspoon ground cumin
1/2 teaspoon dried oregano leaves
1/4 teaspoon chili powder
1/8 teaspoon black pepper
Finely diced jalapeno pepper - to taste

Combine all ingredients in a large bowl.  Adjust amount of jalapeno and/or spices to taste.  Ladle into clean wide mouth pint canning jars.  Press vegetables down so they are under the liquid and/or use a glass weight to weigh them down.  Seal tightly with canning lid and ring.  Set on countertop at room temperature for 2-3 days, or until brine is bubbly and salsa tastes tart.  Remove weights and reseal with lids; place in refrigerator until ready to eat.  Will keep in fridge for up to a few months.  Makes about 5 cups of salsa.


lacto-fermented salsa, strawberry-kiwi salsa, tomatoes


Annie's Basic Lacto-Fermented Strawberry-Kiwi Salsa

3 cups of diced tomatoes (no need to peel)
1 cup of chopped strawberries and peel, diced kiwi (any amounts to total 1 cup)
1/2 cup diced onion
1/4 cup diced green bell pepper
3 cloves garlic, minced
4 Tablespoons whey
2 Tablespoons fresh lime juice
2 Tablespoons sugar (optional)
1 Tablespoon sea salt
2 teaspoons finely chopped cilantro (optional)
1 teaspoon ground cumin
1/2 teaspoon dried oregano leaves
1/4 teaspoon chili powder
1/8 teaspoon black pepper
Finely diced jalapeno pepper - to taste

Combine all ingredients in a large bowl.  Adjust amount of jalapeno and/or spices to taste.  Ladle into clean wide mouth pint canning jars.  Press vegetables down so they are under the liquid and/or use a glass weight to weigh them down.  Seal tightly with canning lid and ring.  Set on countertop at room temperature for 2-3 days, or until brine is bubbly and salsa tastes tart.  Remove weights and reseal with lids; place in refrigerator until ready to eat.  Will keep in fridge for up to a few months. Makes about 6 cups of salsa.

Thursday, June 28, 2012

Lacto-Fermented Love

More than once, my blog friend Cathy asked me if I had tried the lacto-fermented vegetables from the Nourishing Traditions cookbook.  She said they were really good.  I kept telling her no, but that I intended to try them.  Finally, a couple of months ago, I gave them a try.  Now I wonder why I waited so long.  I mean, I knew I would like them, but I had no idea how much I would love them!

Ginger carrots

Lacto-fermented veggies aren't like typical vinegar pickles.  For one thing, they don't contain any vinegar.  For another, they don't need to be canned (water-bath processed) like traditional pickles do.  And finally, they have probiotic properties that are good for your digestive system.

Lacto-fermented veggies taste different than vinegar pickles.  The veggies are raw, so they stay crunchier (the exception possibly being cucumbers) and the brine is, in my opinion, more mellow.  The flavor develops with age, so the young pickles you taste after three days of fermentation on your kitchen counter will not taste the same after three weeks in your refrigerator.  Well, that's what I've read, anyway, but I can't imagine them lasting three weeks in our refrigerator.

Lacto-fermenting is also an easy process.  Canned pickles aren't difficult, but L-F pickles are way easier.  Just chop veggies and let them sit in a brine at room temperature for a few days.  Nothing could be simpler.

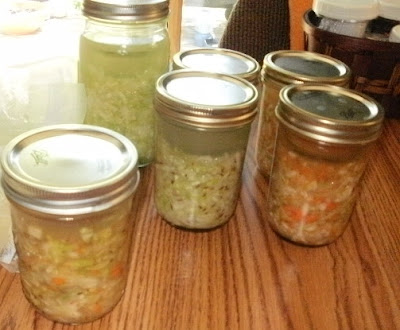
So far, I've made lacto-fermented radishes, turnips, dilled celery, ginger carrots, coriander carrots, plain sauerkraut, caraway sauerkraut, spicy cortido (Latin American sauerkraut) and one jar of a wonderful mix of all of those leftover kraut flavors.  Shane and I agree that the radishes are our favorite so far.

Two jars of turnips, one of ginger carrots, and one of radishes

Shane has said a couple of times that the ferments are his very favorite way to eat veggies.  I have grilled him, asking if they are better than corn on the cob, or fresh tomato slices or a nice ripe avocado with a touch of sea salt, which are all favorites around here.  He wouldn't say one way or another, which leads me to believe it's a close race.

As for me, I crave these veggies.  It's not unusual for me to spoon out a quarter cup or so to just eat by themselves, but what I really like -- a lot -- is to spread a couple of slices of homemade bread with some real butter and use any of the fermented vegetables as a sandwich filling.  These sandwiches taste yummy to me, but what's more, my body seems to be calling for them.  I definitely don't mind answering.

I know a couple of readers are already trying these:  Lisa at Easy Frugal Living was fermenting some carrots not long ago, and both the kraut and turnip ferments are very similar to the beginning stages of Patti, The Osage Bluff Quilter's turnip kraut recipe.
Lacto-fermented veggies, cultured food, cortido
Plain kraut, caraway kraut, cortido and a jar of all of them mixed

If you're interested in trying lacto-fermented veggies for yourself, don't be intimidated or think you need to do a big batch.  Here's all you do:

1) Clean and peel your veggies of choice.  Sturdy root vegetables work well, as does cabbage, but don't be afraid to try zucchini, onions, peppers or other vegetables.  Once the veggies have been cleaned and peeled, dice them or shred them as desired.  If diced, you probably don't want pieces bigger than 1/2".

2) Place prepared veggies in a clean canning jar.  Wide mouth works best, I think, and either quarts or pints can be used.  Fill about 3/4 of the way, or maybe a little more.  Add any fresh or dried herbs you might want at this point.

3) Mix a brine.  For every cup of purified water (filtered, distilled or spring water all work, just not chlorinated tap water), stir in 1 tablespoon of sea salt and 4 tablespoons of whey.  I usually have whey left over from making yogurt or kefir cheese.  If you need whey, you can strain plain yogurt or sour cream to get enough...or you can buy whey at the health food store...or you can do without it by adding an additional tablespoon of sea salt.

4) Pour the brine over the veggies, making sure they are completely submersed.  You can use a wooden spoon to press them down into the brine, or you can do what I do and weigh them down with a simple glass (not lead crystal!) votive cup that I bought at a craft store. You can also buy canning weights on eBay.  Some people don't weigh down their ferments, and others prefer using air-locks or special fermenting vessels.  This is what happens to work for me right now.

Simple glass votive cup for weighing down veggies

5)  Cover the jar tightly with a canning flat and ring and let the veggies sit on your counter at room temperature for about 3 days.  After three days, open the jar (it might pop just a little when you do) and remove the votive holder.  Taste the yummy fermented goodness.  It will be really salty and a little tart.  Over time, these flavors will blend and mellow. 

6)  Eat the veggies now or store in the refrigerator for up to several months.


To make sauerkraut, the method is almost the same:  Instead of dicing the cabbage, it needs to be shredded.  I do this by hand, with a knife, rather than with a food processor.  Instead of making a brine with water, just add the salt and whey directly to the shredded cabbage.  Put it all in a large bowl and pound with a wooden mallet of some sort until the cabbage releases it's juices.  I use the wooden part of a food mill that looks like this:


When there is enough liquid, spoon the cabbage and liquid into the jars and proceed as above.

As usual, I'm no expert, but if you have any questions about lacto-fermenting, I'll try to find an answer for you.

Thursday, June 21, 2012

12-Pounder

We finally harvested the cabbage growing in Kat's garden bed.  It grew from a seedling she brought home from school earlier this spring and ultimately weighed in at 12 pounds.

Kat thought it was fun to grow, but she doesn't like to eat cabbage, so she's given me permission to do whatever I want with it.  I plan to make part of it into lacto-fermented kraut, if I can find enough containers.  I don't have a crock, so I guess I'll be making it in gallon jars.

I wondered about pressure canning it plain (not as kraut).  I've read about a few people doing it, but it's not listed as safe by any of the reputable sources (Ball, Kerr, university extension sites, etc.), so instead, I'll blanch and freeze whatever portion doesn't become kraut.  Little, if any, will be made into coleslaw since that isn't a favorite here.


Monday, June 11, 2012

How To Make Dairy Kefir

In my slow, but ongoing, series of posts about fermented foods, today I want to write about milk kefir (pronounced keh-FEAR, or sometimes KEE-fur).  Of the three fermented drinks we currently make and drink (kombucha, water kefir and dairy kefir), this is my favorite.

For anyone who is not familiar with milk kefir, also called dairy kefir or just kefir, it is a cultured (fermented) food item similar to a thin yogurt or buttermilk. It is full of probiotics and, at least to me, is quite tasty.  I think it is milder in flavor than homemade yogurt and find it much easier to make.  It is a good substitute in any recipe that calls for buttermilk, and can even replace sweet milk in many recipes.  If fermented a second time, usually with some kind of flavoring, it becomes slightly effervescent and even tastier, in my opinion.  Best of all, it can also be used to make some great treats.

To begin, you must have a starter, which is usually called kefir grains.  The starter is also known as kefir pearls, kefir scoby, as well as by a variety of other names.  The starter does not come from grain at all, but rather from a combination of yeasts and (beneficial) bacteria.  When dehydrated, it looks like small granules (thus the name). Re-hydrated, it resembles cauliflower, but with a spongy texture. 

kefir culture
Kefir culture (starter).

A nice lady on craigslist gave me my starter, but you can also find them for sale on a number of websites.  If you are local to me and are interested, I can probably set you up with a starter as these things tend to reproduce with each batch of kefir.

Once you've acquired a starter, you combine it in a clean glass vessel (canning jars are good) with fresh milk.  I've read that raw is best, but I've yet to get my hands on any, so I use regular (NOT ultra-pasteurized) whole milk.  I suppose you can use milk with a lower fat content, but I think whole milk is recommended.  The ratio is 1 tablespoon of starter grains to 1 cup of milk.  I usually make several cups at a time, either in multiple jars or in a gallon glass jar.

kefir
Starter in the jars and ready for milk.

Milk Kefir
Milk.  Not raw or organic, but local.

Once combined, cover your jar with a clean cloth or coffee filter and secure it with a rubber band.  This will keep dust, gnats and the like out of the kefir.  Set the jar on the counter, at room temperature and several feet away from any other cultured foods you have going, and let it sit for 12-24 hours.  You will know it is working when you see small pockets of whey (clear, yellowish fluid) develop both on top and throughout the milk. 

Dairy Kefir
Kefir, ready for the first fermentation.

You'll know it is done when the milk has thickened to the consistency of thin yogurt or buttermilk, and tastes slightly tart.  The longer you let the kefir culture, the more tart it will be.  When it is as tart as you like it, strain the kefir through a plastic strainer or a fine colander to remove the grains.  At this point you can start another batch with the grains.  The liquid kefir is now ready to drink or use in recipes.  Just store it in the fridge in a covered jar to slow the fermentation process.  Better yet, it can be flavored and fermented a second time for added flavor.  It's my understanding that the second fermentation also increases the B vitamin content significantly.

To do a second fermentation, just pour the kefir into clean jars (without any of the grains in it), and cover tightly.  Let sit on the counter for another 12-24 hours (the warmer the room, the less time it will take) or until you see whey forming again, this time at the bottom of the jar.  Once that happens, move the jars to the refrigerator until you are ready to use it.

kefir whey
Layer of whey forming under second-fermented kefir.

You can also flavor your kefir for the second fermentation by adding sweeteners or fruit.  Two of my favorites have been pure maple syrup with vanilla, and slices of organic oranges (rind and all) with a little organic sugar.  I've also successfully used crushed and sweetened strawberries, strawberry-rhubarb syrup, vanilla extract with sugar, lemons, limes, and crushed blueberries.  Once the second fermentation is complete, the result is a lightly fizzy, sweet-tart and fruity beverage that, while made with milk, is not heavy at all. 

Second-ferment kefir
Kefir being flavored for a second fermentation.

If you like, you can replace the milk in kefir with coconut milk.  The taste is a lot different, but if you like coconut, it's very pleasant.

I've also used kefir, both single- and double-fermented, to make healthy and yummy ranch dressing.  I just use it to replace the buttermilk in this recipe.

Sometimes, if you let the kefir ferment too long, either during the first or second fermentation, it can separate into defined layers of curd and whey.  If that happens, all is not lost.  The simplest thing to do with it is just stir it back together.  It is not as creamy as it could be, but it is still flavorful and perfectly safe to drink. 

Another option is to strain the whole thing through a plastic mesh strainer, completely separating the curd from the whey.  The whey can be used in baking or for lacto-fermented veggies (recipes to come), and the curd can be used as a cream cheese or sour cream substitute.  The kefir curd (kefir cream) is also an ingredient in this:

kefir ice cream
Chocolate kefir ice cream.

I promise it will be my next cultured food recipe, and I promise you'll love it.

Friday, February 17, 2012

Weekly Anti-Inflammatory Check-In

As many of you know, I've been following along with Erica at NW Edible Life as she takes on a month of anti-inflammatory dieting.  I've been participating to a small extent.  I know this kind of post isn't for everyone, but I think there is only one or two more update after this, so I hope you'll please bear with me.  Here's my recap for the week. 

I had some setbacks:
  • I made lunch for my grown daughter, who follows a vegan diet.  I made whole wheat pasta with cauliflower, broccoli, carrots, oven-dried potatoes and garbanzo beans.  We each added various oils and seasonings, and  I opted for vegetarian rather than vegan by adding three kinds of cheese to mine.  It was really tasty, so I ate the leftovers for supper that night and again for lunch the next day.  All that carby, veggie goodness made it hard for me to stay awake by Saturday afternoon.
  • On Sunday, we visited my dad and he served us mostly junk.  Now, of course I had the choice to not eat, and I did avoid some of it, but I would never intentionally hurt the feelings of a host (especially family) who sets out food with love.  So I did the best I could.
  • I do, however, claim full responsibility for the second soda I had on the way home from my dad's. 
  • I ate a school lunch on Valentine's Day.  You can read about it in my post from Wednesday.
  • I don't think I did a single thing toward getting extra exercise this week.

I made some gains as well:
  • I reduced the sugar in our big batches of iced tea even more than last week.  We were using 3/4 cup in a gallon of tea, and now we are down to 1/2 cup.  
  • I am still using honey, cane juice crystals, molasses, etc. in baking, although I didn't do as much baking this past week. 
  • I have rediscovered the wonders of coconut oil.  I knew about the health benefits that come from eating it, but I had never really put coconut oil into heavy rotation in my kitchen.  It is now!  
  • Coconut oil is making it's way into our bathroom, too, as a moisturizer, toothpaste, hair conditioner and so on.
  • I've been trying to add more veggies to our evening meals.  For supper, we usually have meat, a starch and two veggies (or maybe just one veggie occasionally).  I'm trying to add a third vegetable, or sometimes a piece of fruit, to most of our dinners.
  • I'm doing great at eating breakfast.  I don't think I missed a day all week.  I've had either oatmeal, oat bran or an avocado for most of my morning meals, and when it was oats, I stirred in a spoonful of coconut oil.
  • We're still drinking kombucha daily, and in fact, I set up a continuous brewing system yesterday.
  • We did not go candy crazy on Valentine's Day.  I bought Kat two small candy items and rounded out her gift with a craft kit.  Something to do, rather than something to eat.  :)  I made a batch of just five cupcakes from my Small Batch Baking book, but I used whole wheat flour, coconut oil and cane juice crystals in the cake and real butter in the frosting instead of ingredients that were listed.  BTW, one of those cupcakes still sits in the fridge uneaten.
  • We ate salmon twice during the week.  Living in the Midwest, the choices are frozen or canned.  If it is "fresh" (as in, not frozen) in the seafood case, it was probably still frozen during transit.  We ate previously frozen fillets one night and quinoa-salmon patties from canned salmon another.  In both cases, I made sure they were wild, not farmed.  We all like fish, so these dishes were a hit.
  • I'm still sticking to my 11:00 p.m. to 6 a.m. sleep schedule.   I find it really makes a positive difference when I stay on a schedule.

As for how I feel, the most noticeable change is that I feel like I have more energy during the day, and that I might be sleeping better at night.  When I didn't eat meat for several meals in a row, I felt a lot more sluggish, then better when I finally did eat some animal protein.

I feel like my skin is clearer and brighter. 

I had a migraine headache, but it was both milder and shorter in duration than most.  While I'd love to attribute that to something dietary, this will have to happen consistently before I chalk it up to anything other than some good luck.

One other thing I've noticed is that I've been comfortably warm.  I have hypothyroidism and I often feel uncomfortably cool.  That condition seem to have improved very recently.

It's just past mid-month.  Plenty of time to do better in the next couple of weeks...I hope.

Monday, February 6, 2012

Exhausting Weekend, But In A Good Way

Thanks to rain on Friday, Shane had another three-day weekend.  He spent part of his day off in the doctor's office, though, getting meds for a sinus infection he'd been fighting all week. 

He was already feeling a lot better by Saturday morning, so out we went.  First to drop Kat at her mom's for the weekend, then to Lowe's to pick up a special dryer vent, to a thrift store to drop off a mountain of donations that were in the back of the van, and to the credit union to make a payment on our camper in person because they forgot to include a February ticket in our payment book. 

That was followed by an hour-long drive to pick up an almost new tiller from someone who'd listed it on craigslist (the same new one at Lowe's was more than twice as expensive!), followed by a stop to see Shane's dad and step-mom, install the dryer vent we'd bought earlier, and to have lunch with them.

After leaving the in-laws' house, we went to a health food store for some soap making oils, went to a freight salvage store just for fun, stopped at Sam's Club to get a few things I'd missed last time I was there, and we finally ended our day by going to a Chinese-and-sushi buffet before heading home.

We were out for 12 hours straight, and I barely stayed awake until 10:00.

On Sunday, I put in my monthly volunteer hours at the recycling bins.  Our city is getting 24/7 recycling bins soon, instead of the one-weekend-a-month bins we have now.  That means recycling will be easier for everyone here and no one will have to monitor bins anymore.

It was too muddy for Shane to work outside, so we worked together nearly all day making two small batches of bath soap bars, one batch of shampoo bars, and a batch of solid lotion bars.  No pics of any of it yet, but I'll probably take some as the goodies come out of the molds.

We rebottled three batches of kombucha, some with fun flavor combinations, and we got two new batches started.  We also used our juicer to make some orange and pineapple juices. 

When Kat came home around 5:30 , we made some roast beef wraps with lots of veggies (sub-shop style) and watched a couple of kids' shows on TV with her.  By the time she went to bed we were wiped out!  We were in bed with our books by 9:00 and were asleep before 10:00.

That's two good weekends in a row for us.  We got a lot accomplished and had some fun doing it.

How was your weekend?

Thursday, February 2, 2012

Making Kombucha Tea

Who here is familiar with kombucha tea? It's a fermented tea drink that is thought to be healthful.  If you've not heard of it, here's an excerpt from wiseGEEK, who explains it better than I can:
Kombucha is a fermented beverage made of tea and bacteria cultures. For the last 2,000 years in Asia, families drank kombucha for its purported medicinal qualities. The special yeast and bacteria cultures are usually circulated person-to-person, although now mixtures can be purchased online. This homeopathic drink tastes tart but full-flavored, like carbonated apple cider. Kombucha recipes have traveled to Korea and Japan, from there to Russia, and finally reached Europe after WWI.

You must have a "mother brew" to cultivate kombucha, which is why originally it was handed down through generations of a family. Much like yogurt, a cup of kombucha can be reserved to make the next batch. This is because it is a living brew, with microorganisms that are beneficial to our digestive tract and others claim help other internal systems. The culture is not a fungus, as some report, but a mixture of bacteria and yeast that forms a gelatinous, yellowish substance.
Ok, so it doesn't sound all that appetizing, but if you like tart, slightly fizzy drinks, it's a good one.  Shane and I both like the commercially-prepared kombucha tea we've tried in the past, but it's kind of dear at $3-$4 for a 12-16 ounce bottle.  It's not that easy to find, either, so we'd been trying to find a "mother", also known as a scoby (Symbiotic Culture of Bacteria and Yeast) for a while.  The closest we came was talking to a person on craigslist who not only lived too far away, but had a weird schedule and a weirder online presence.  When that didn't work out, I put the idea on the back burner.

I was thrilled when I learned in December that an acquaintance, George, makes kombucha tea.  Most of the friends we have in common with George think it's just weird and wouldn't even try it, but things like kombucha are right up our alley.  George was so pleased that we even knew what he was talking about that he offered us some mothers for free.  I made a couple of small "starter" batches just to make sure I could do it right, then I started making gallon-sized batches.  Here are the details of the first big batch I made.

Beware that these photos may not be suitable for wimps the "culinarily squeamish".

Three "mothers" (starter cultures) in some kombucha tea that our friend gave us.

The jar above contains three scobys and about 1 to 1-1/2 cups of kombucha tea from one of George's batches.  The scobys are disc-like and spongy.  I read somewhere that they feel like calamari.  Yep, that's as good a description as any.

Per directions George gave me (which appear to have come from the Cultures for Health website)  I brewed some tea, using 13 cups of distilled water, 1 cup of sugar and 2 Tablespoons of loose tea (or I could have used 8 tea bags).   After letting the tea steep until it cooled to room temperature, I strained it to remove the tea leaves, then added 1 scoby and 2 cups of George's kombucha tea.  I covered the jar with a coffee filter to keep out dust and other foreign particles.  Then I left it to sit on the counter, out of direct sunlight, for several days.

Brewed sweet tea with a scoby and some kombucha tea added.
Closer look at the scoby in my first big batch.


The tea can be ready in as little as 5 days, depending on your taste.  We like ours a little more tart, so we leave ours longer.  Here is the same jar on Day 9.  


Notice how the tea has lightened in color. You can see the new "baby" culture on top and you can also see that the mother floated to the top at some point and attached to the baby.  It happens sometimes; other times not.  Doesn't really matter. 

This is a living culture, so it changes daily and never turns out exactly the same way twice.  The tea tastes sweet, tart, musty (like wine, especially homemade wine), and is lightly carbonated.  It "tingles" on the tongue when you taste it.  If you've ever had homemade ginger beer or soda, it's kind of like that.

Then what?  First of all, I reserved a three cups of the new tea -- 2 cups for the next batch I made and 1 cup to cover and protect the new scoby I now had.  Then we stored this first batch in the fridge and drank it as it was, either straight or mixed with more of our regular sweet tea.  Since then, we've been playing around, using green tea as the base, letting batches ferment for 2, 3 and 4 weeks, mixing some of the tea with fruit juices and other beverages and pouring some into airtight containers to ferment a second time so that it becomes even more carbonated.

Over time, we're going to find ourselves with more babies than we need.  When that happens, we can either give them away to someone else who wants to make their own kombucha, or we can compost them.  No problemo.

So, that's that.  It's an easy process, but not a quick one. It's a real money saver, too, if you're in the habit of drink kombucha tea regularly.   Doing a very rough calculation based on costs of tea, sugar and distilled or purified water, a batch like this could cost as little as $1.80 (more if you use organic tea and sugar...I didn't, but I probably should in the future).  I get about six 16-ounce servings after taking evaporation into account.  That's as little as 30¢ for what would cost at least $3.00 in the store.

I'll be posting more about kombucha as I learn more about the brewing process.  If you're eager to learn more about it, check out this tutorial from Cultures for Health.  Or just do a Google search and you'll find dozens of links.

Anyone else out there tried kombucha?  Would you ever consider making it at home?


Related Posts Plugin for WordPress, Blogger...