Showing posts with label Healthier Foods. Show all posts

Tuesday, May 7, 2013

April Resolution Review

I'm a week late with this post, but April was a whirlwind for me, and I'm just now catching up.

I set some goals at the beginning of the year, so I thought I'd give a quick monthly update on my progress in April. 


Reading: 
  • Goal - 18 Books and more than a year of Mother Earth News and Hobby Farm Home back issues (and yes, I've let the subscriptions to those magazines expire).
  • April Progress - Read 2 books (9 books of 18 total), and none of the  magazines (so still at 10 magazines of 38 total). 
The books I read were:


Crafting:
  • Goal - 12 completed projects, preferably one a month, with one being a quilted item and another being knit socks.
  • April Progress - Quilted a table runner for my dresser ( 4 projects of 12 total)

So, I finally quilted something.  So many people (I'd venture to say they're mostly women) say quilting is their hobby of choice, so I wanted to see what the fuss was all about and learn a new skill.  I enjoyed the process, but I didn't love it.  On a scale of 1-10, with 1 being a crafty project I hate, like mending clothing, and 10 being a project I love, like crocheting an afghan, I give quilting about a 6. 

I chose colors that coordinated with our bedroom, and I think selecting the fabric was the best part of the process.  I also enjoyed doing the machine quilting, which in this case was simple diagonal lines.  Cutting and piecing the top was okay, as was sewing on the binding.  The part I didn't like was, that as careful as I felt I was being, there were still glaring mistakes.  I've read that it's to be expected with a first quilt.  I chose to leave the mistakes in, because I just didn't have the patience to rework any of them.  That is the main reason I may not quilt anything else.  Then again, maybe I will.  It will probably depend on the type of project and my mood.

All that said, here it is.  It's a simple hourglass pattern, without border, but with binding I cut myself.  I did all of it on the machine.  If anyone is interested, here is the pattern, and here is the websites I used to teach myself the basics of quilting, and how to get the diagonal lines straight.


Gardening: 
  • Goal - Organized planning, leading to an organized garden.
  • April Progress - We completed our spring planting sometime early in April, but I don't recall taking time to fill in what we did in my garden organizer.  I really need to do that before I forget entirely.

    And I'll just be blunt.  Three mornings of frost in late April sucks.  Snow (yes, snow) during the first week of May sucks more.  So far, everything has survived, with the help of tarps and upended buckets for cloches, but growth has been very slow for this time of year.


Diet/Nutrition:
  • Goal - To switch over to less harmful types of sweeteners and/or reduce sugars in our foods.  To grow more of our food in our backyard.
  • April Progress - We switched away from buying granulated white sugar in March and were able to stick to that decision in April.  No other changes were made.


Fitness:
  • Goal - To join a local yoga class better flexibility, balance and overall health.
  • April Progress - Again I say, gardening is great exercise!  Reach high for the tarps, carry them to the garden, spread them out, haul firewood to hold them in place, wait out frost and snow, then reverse.  Repeat approximately once a week, well past last average frost date.


Finances:
  • Goal - To pay off our RV.
  • April Progress - Shane continues to work out of town several times a month, so we are continuing to pay extra each month toward the loan principal.  A noticeable dent in the balance is being made.

Friday, April 19, 2013

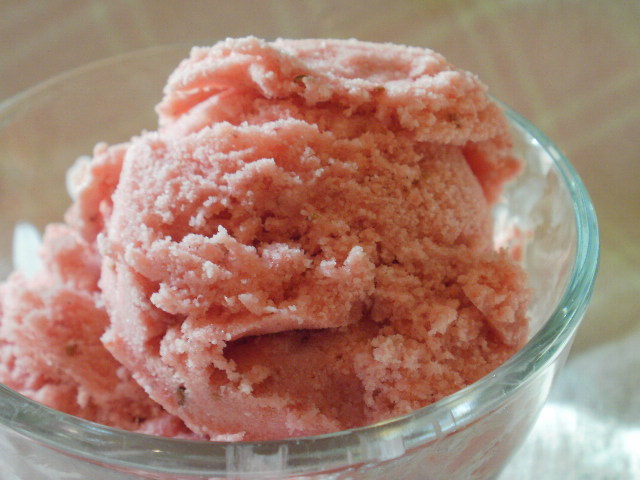
Couldn't-Be-Easier Strawberry Ice Cream


Our strawberry plants are beginning to bloom, so it won't be long before we have enough berries for ice cream!  This ice cream has just four ingredients and doesn't require an ice cream freezer.  I used frozen strawberries from last summer for this post.  I have also used blackberries, raspberries, and peaches with good results.  Just make sure they are solidly frozen first, and adjust the sweetness after everything else is blended.  You may not need as much sugar as you think.

This ice cream is fresh tasting, and both sweet and tangy at the same time.  I think you'll love it!


Couldn't-Be-Easier Strawberry Ice Cream

2 cups of frozen strawberries (if frozen in syrup, reduce or eliminate sugar)
2 cups heavy cream (I had and used raw cream, but any heavy cream will do)
1 teaspoon vanilla extract
sugar to taste; amount depends on fruit and whether or not it has a syrup

Place frozen berries in bowl of a food processor with the chopping blade attached.  Process berries until ground into fine bits, almost like a course powder.  Warn your family and pets first that this will make A LOT of noise.

Add vanilla. 

Add cream gradually while continuing to process, until the mixture is the consistency of soft-serve ice cream or a very thick milkshake.  Stop processor and scrape down sides as needed. 

Taste for sweetness; add sugar or other sweetener 1 Tablespoon at a time until desired sweetness is reached.

Spoon ice cream into a freezer-safe bowl with lid and chill until firm, 1-2 hours.  Alternately, you can spoon the soft mixture into traditional freezer-pop molds or silicone yogurt/popcicle molds for individual frozen treats.

Makes about 1 quart of ice cream.

Wednesday, April 17, 2013

Healthier Nacho Chicken Casserole

Recently I saw a recipe for a Mexican-style cheesy chicken casserole that sounded tasty, but it had a few ingredients I'd rather not use, like canned cream of chicken soup, white rice, and packaged taco seasoning.  It also had pre-shredded cheese (eww - cellulose) and canned corn (eww - I don't like it).

I decided to make some changes so that I'd feel better about eating it and serving it to my family.  Here's my version, which I think is a little more nutritious.


Healthier Nacho Chicken Casserole

3 Tablespoons butter
3 Tablespoons unbleached white or whole wheat flour
1-1/2 cups chicken broth (preferably homemade)
1-1/2 to 2 cups cooked brown rice (1/2 cup before cooking)
1 medium ripe tomato, diced
1-1/2 cups frozen kernel corn
1/4 cup diced red bell pepper
1/4 cup diced green bell pepper
1 can (4 oz.) diced green chiles, with liquid (could use 1 large fresh mild chile, seeded and diced)
2 Tablespoons homemade taco seasoning (or 1 packet of store bought seasoning)
1-1/2 cups shredded cheddar cheese (shredded from block cheese), divided
2 cups diced cooked chicken (either light or dark is fine)

Heat oven to 350°F.  Spray a 2-quart baking dish with pan spray.

Melt butter in a medium saucepan.  Stir in flour.  Cook and stir for 1-2 minutes.  Whisk in chicken broth and bring to a boil, stirring constantly.  Whisk until mixture thickens.  Set aside.

In large bowl, combine rice, tomato, corn, red and green bell pepper, chiles, taco seasoning, 1 cup of cheese and chicken.  Pour thickened chicken broth over mixture and stir until well combined. 

Transfer mixture to prepared baking dish and bake for 30 minutes or until heated through.

Top with remaining 1/2 cup cheese and the crushed tortilla chips.  Return to hot oven for 10 minutes.  Serve hot.

Makes 4 to 6  servings.


Wednesday, March 13, 2013

2-Ingredient Lentil Soup

Here's another "real food" soup that only has two ingredients (not counting water), but packs LOTS of flavor.

I used some ham stock that I had previously cooked and canned, but you could start from scratch with a meaty ham bone or some ham hocks, along with some water, to make your stock.   If you do that, you'll also have bits of ham to add to your soup.

If the ham was flavorful, the stock will be, too, and you may not even have to add additional seasoning.

Real Food Lentil Soup


2-Ingredient Lentil Soup

2 cups ham stock, preferably homemade
1 cup water
1 cup brown lentils, rinsed

Combine all in a medium pot.  Heat to a boil over high heat, then reduce heat to a simmer or slow boil.

Cook for 1 hour or until lentils are tender.

If desired, mash lentils lightly to thicken soup, then serve.

Makes 4 side dish servings, or 2 generous main dish servings.

Wednesday, March 6, 2013

Ham and Potato Soup: Quick and Simple Real Food

Get ready for this.  A flavorful soup with just two ingredients (okay, three if you count the water), that's good for you (mmm...that bone broth), and can be done in just less than an hour (really). 

If you like, add a little cream, sour cream, or cream cheese to finish.  Sprinkle the top with green onions, shredded cheddar, croutons or freshly ground black pepper.  Make it your own.  Or stop right here with just the two ingredients.  That's what I'm doing today.  Keeping it real.

If you don't have a pressure cooker, feel free to cook this for several hours in a slow cooker or a covered pot in a low oven.  You'll get great results, just not quick ones.  Keep this recipe in mind for the leftovers of your after-Easter ham.


Quick and Easy Pressure-Cooked Ham and Potato Soup


1 pound ham hocks (or a large, meaty leftover ham bone)
2 pounds (more or less) potatoes

Place rack in bottom of pressure cooker per manufacturer's instructions.  Place ham hocks or ham bone on rack.

Add about 2 cups of water to cooker, place lid on and heat over high heat until steady stream pours out of valve.

Place weight on valve.   Once weight begins hissing or rattling (will depend on your particular cooker) reduce heat just enough to keep weight hissing or rattling.  Begin timer and cook for 45 minutes. 

Meanwhile, peel potatoes and cut in to cubes of approximately 1 inch.  Keep potatoes covered with water until ham has finished cooking.

Remove cooker to sink and reduce pressure by running cold water over cooker.  Carefully remove lid and set aside.  Spoon out ham hocks with a slotted spoon and set aside.

Drain potatoes and add to liquid in pot.  Add about 1/2 cup additional water.  Replace lid and return to high heat on the stove.

When a steady stream of steam is coming from valve, replace weight.  When hissing or rocking begins, adjust heat as before and begin timer to cook for 6 minutes.

Meanwhile, pick ham from bones and set aside.  Discard bones or save to make more stock.

After potatoes have cooked for 6 minutes, remove from heat and reduce pressure using cold water method.  Carefully remove lid.

Using tongs, carefully remove rack from pot.  Add ham pieces to pot and stir vigorously to break up some of the potatoes to thicken the soup.  Transfer soup to serving bowl or tureen and serve.

Makes about 4 servings.

Friday, February 15, 2013

Garden Planning - Step 1 - Knowing What You Eat


I've mentioned before that I bought a neat-o perpetual garden planner download from Northwest Edible Life, and have all intentions of using it this year, but our printer pooped out last week.  Until I can find a replacement printer for cheap or find time to take the file to be printed out at a printer-outer shop, I'm stuck with old-school pencil and paper.

I had to do a little research to remember, but I've determined that this will be our fifth season in the garden.  In the past, we've grown a little of this, a little of that, and whatever sounded interesting.  It's a fun way to garden, and a great way to learn what you like, don't like, can grow well, or can't grow at all.

This year, though, we're approaching gardening a little differently.  There will still be plenty of variety and a bit of novelty, but we're really going to focus on growing what we eat most.

With that in mind, the first step in this year's plan was to write down everything I could think of that we eat that is plant-based.  From tomatoes to dry beans to rice to tea to pineapple.  I used a seed catalog or two to help me remember everything and I wrote down things I know we can't grow simply because they might jog my memory about things we can grow here.

Then I went through and crossed off anything that we can't grow in our area (things like citrus, tropicals, coffee) and anything we don't have room to grow (grains, mostly) and things I'm just not ready to try yet (grapes, mushrooms).

Once that was done, I considered our family demand.  How often do we eat these foods?

There are several vegetables, fruits, and berries that we eat often and grow well for us.  Because these are on our menu several times a week all year round, these will be the biggest money-savers and nutrition-givers.  They will stay on the list.  Frequently-used herbs also stay at the top of the list.  For some reason I'm not very successfully at growing herbs, but if I can get successful, then cha-ching!  Big savings!

Several crops will grow well for us, but we don't eat them as often.  They'll be planted if we can work them in, or dropped without regret if we can't. 

Some foods are better for us to purchase, either because we don't eat that much of them, we have tried growing them before with little or no luck, we know they won't grow here at all (coconuts, anyone?), or we don't have room to grow them even though they will grow here (wheat is good example).  Unless we just want to try a couple of these crops for the fun of it, they won't make the cut.

The end result should be a fairly accurate list (below) of what we'll be planting this year.  Your list will vary depending on your appetite, gardening zone, skill level and space limitations.


Already-Established Perennials:

Asparagus
Rhubarb
Strawberries
Blackberries
Elderberries
Raspberries
Sunchokes

Definitely Will Plant:
Green beans
Lettuce, variety
Onions, bulbing
Garlic
Tomatoes
Potatoes
Dry beans
Carrots
Beets
Zucchini or other summer squashes
Onions, green (scallions)
Spinach
Swiss chard
Bell peppers
Cucumbers
Radishes
Cilantro
Parsley
Basil
Thyme
Oregano
Cumin

Will Plant If It Works Out:
Sweet Corn
Peas (shell-out and snow varieties)
Kohlrabi
Cauliflower
Broccoli
Brussels sprouts
Celery
Eggplant
Cabbage
Napa cabbage
Collard greens
Jalapeno peppers
Winter squash (butternut, acorn)
Ground cherries
Watermelon
Okra
Sunflowers
Ginger
Summer savory
Sesame (for seeds)
Gooseberry bush(es)
Peach tree(s)

Be prepared.  Next week, we start talking numbers.

Wednesday, January 16, 2013

Shedding the "All or Nothing" Mentality

I think a lot of us who aspire to the frugal lifestyle sometimes get caught up in the idea that our efforts have to be all or nothing.

This applies equally to those of us who are trying to eat "clean" and keep our homes and gardens as chemical-free as possible. We begin to think that anything less than perfection is a compromise. We let perfect get in the way of good, and best get in the way of better.

Well, let me tell you, I'm not perfect, you aren't perfect, and neither is anyone else.

  • So far this month, I've baked several loaves of homemade bread, ground my own wheat, and even made homemade flour tortillas and saltine crackers.  But I've also bought bread, tortillas, and crackers, and used store-bought white flour.
  • I've dried clothes on my drying racks, but I've also used my dryer.
  • I bought farm eggs and local honey, but I forgot my jugs when I went for raw milk and rather than drive back out to the farm, I bought big-dairy milk at the store.
  • I try to consolidate errands as much as I can to save gas, but I warm the truck up on cold mornings.
  • We harvest rainwater for our gardens to conserve water and save money, but I take a deep, hot bath whenever I want one.
  • We make our own bath soap, laundry soap and toothpaste, but still use Dawn for dishes and commercial deodorant (for now, anyway).

We have given up striving for best and perfect.  But we do try to make better choices and execute better practices, and will continue to try to improve.  We don't let the idea of perfection stop us in our tracks.

That's good enough for us.

Wednesday, November 7, 2012

Whole Wheat Pumpkin Pancakes


For Saturday brunch I came up with these relatively healthy pancakes with the flavors of pumpkin pie.  I learned at the last minute we were out of maple syrup, so I drizzled just a little heated caramel ice cream topping on Kat's.  For my own, I spooned on some homemade ginger-peppercorn syrup.  It doesn't sound like a sweet treat, but it really brought out the pumpkin flavor in this breakfast.


Whole Wheat Pumpkin Pancakes

1-1/2 cups whole wheat flour
1/4 cup sucanat, brown sugar, or sugar of choice
2 teaspoons baking soda
1 teaspoon salt
2 teaspoons pumpkin pie spice
2 eggs
1-1/4 cup milk
1/2 cup pumpkin puree (canned or fresh)
2 tablespoons coconut oil, or oil of choice
Pan spray

In a large bowl, combine dry ingredients and mix well.

In a separate medium bowl, whisk milk with eggs and pumpkin.

Pour egg mixture into flour mixture and stir well.  Add additional milk if batter is too thick.  Stir in oil; if using coconut oil, melt it first if it is solid.

Heat large skillet or griddle over medium heat.  Spray pan with pan spray before each pancake.  Using 1/4-cup measure, measure batter onto hot griddle.  Cook until bubbles form and break on surface.  Flip to other side and cook and additional 1-2 minutes. or until cooked through.

Serve with butter and maple syrup, caramel topping or ginger syrup.

Makes about 14-15 4-inch pancakes.

Tuesday, September 18, 2012

Kat's Favorite Smoothie

After going to Cafe Gratitude a couple of weekends ago, I decided to whip up a smoothie for Kat that was inspired by the one she had there.  Theirs includes dates for the sweetener and vanilla bean.  Ours includes banana and honey for the sweeteners and vanilla extract.  It was also a lot more budget-friendly to make at home.

Kat asked me to put this smoothie on the list.  When I asked her what list, she said the list of good smoothies!  What further recommendation is needed?

Copycat Cafe Gratitude "I Am Grace" Smoothie


Kat's Favorite Smoothie

1 cup coconut milk
1 very ripe banana
1/4 cup almond butter
1/2 teaspoon vanilla extract
honey to taste

Add all to a blender or food processor and mix well.  Serve immediately.  Makes about 2 cups.

Wednesday, July 25, 2012

Super Easy Protein Bars (Larabar Knockoff)

Ok.  I admit that I've never worked with dates before, and I've never tasted a Larabar, so I don't know how closely they resemble the real thing.  What I do know is that these are very tasty, very easy, pretty darn healthy, and don't require heating the oven.  They are the perfect summertime treat.

I made two small batches of these bars in about 15 minutes.  I made a Mixed Berry Cobbler variety and an Almond Butter-Chocolate Chip variety.  But really, these bars can be anything you want them to be.  All you need is dried dates (I used Medjool dates), a protein source such as nuts/seeds or nut butter/seed butter, and something to add a little extra flavor, such as chocolate chips or dried berries. 

You can add shredded coconut, cocoa powder, coconut oil, cinnamon or other spices.  If you can't find the dates, I think you could make these with dried figs or dried apricots, although the flavor would be different and they might need a little honey to sweeten them and hold them together.  Really, the possibilities are endless.

Right away, I liked the Mixed Berry Cobbler bars.  Kat seemed more fond of the Almond Butter-Chocolate Chip.  Shane liked them both.  And if you can hang on to them for a day or two (in the fridge is best), the flavors really develop. 

These bars are great with morning coffee, as a lunchbox treat, or as a protein-rich afternoon pick-me-up.


Almond Butter-Chocolate Chip Protein Bars

 Mixed Berry Cobbler Protein Bars

1/2 cup (about 6 large) dried dates, pitted
1/2 cup mixed dried berries (those I bought had blueberries, cranberries and cherries)
1 cup almonds (I used sliced, but whole will work)

Combine all in a food processor and process until a course meal-like texture is achieved.  Add water if necessary, 1/2 Tablespoon at a time, until mixture will hold together.

Scrape mixture out onto waxed or  paper, and using a spatula, form into a rough square or rectangle.  Top with another piece of waxed or parchment paper and roll to about 1/2" thick.  Using a spatula, even up sides if desired, and cut into bars.  Makes 8-10 bars.

Best if stored in refrigerator.


Mixed Berry Cobbler Protein Bars


Almond Butter-Chocolate Chip Protein Bars

1/2 cup (about 6 large) dried dates, pitted
1/2 cup semi-sweet or milk chocolate chips - divided
2 to 4 Tablespoons almond butter

Combine dates and 1/4 cup chocolate chips in a food processor and process until a course meal-like texture is achieved.  Add almond butter, a tablespoon at a time, until mixture will hold together.  How much you need will depend on the consistency of the almond butter.  If it is very thick, you may also need to add a teaspoon or two of water.

Scrape mixture out onto waxed or  paper, and using a spatula, form into a rough square or rectangle.  Sprinkle remaining 1/4 cup chocolate chips on top and press them in lightly.  Top mixture with another piece of waxed or parchment paper and roll to about 1/2" thick.  Using a spatula, even up sides if desired, and cut into bars.  Makes 8-10 bars.

Best if stored in refrigerator.

Monday, July 16, 2012

Lacto-Fermented Salsa - Two Ways

Our tomatoes are finally coming in, so this week I'll be focusing on a variety of tomato-y condiments.  Here are a couple of different flavors of lacto-fermented salsa.  Keep in mind that L-F salsa is preserved with salt or a salty brine --it's what makes lacto-fermentation work -- so it will taste saltier than many other salsas.  You can offset that by serving it with low-sodium tortilla chips and/or reducing the salt in the Mexican or Tex-Mex dishes that you'll be topping with the salsa.

If you have more salsa than will easily fit into your jars, it can be eaten the day you make it.  However, the flavors will blend and mellow the longer it is stored.


salsa, lacto fermented salsa, tomatoes


Annie's Basic Lacto-Fermented Tomato Salsa

4 cups of diced tomatoes (no need to peel)
1/2 cup diced onion
1/4 cup diced green bell pepper
3 cloves garlic, minced
4 Tablespoons whey
2 Tablespoons fresh lime juice
1 Tablespoon sea salt
2 teaspoons finely chopped cilantro (optional)
1 teaspoon ground cumin
1/2 teaspoon dried oregano leaves
1/4 teaspoon chili powder
1/8 teaspoon black pepper
Finely diced jalapeno pepper - to taste

Combine all ingredients in a large bowl.  Adjust amount of jalapeno and/or spices to taste.  Ladle into clean wide mouth pint canning jars.  Press vegetables down so they are under the liquid and/or use a glass weight to weigh them down.  Seal tightly with canning lid and ring.  Set on countertop at room temperature for 2-3 days, or until brine is bubbly and salsa tastes tart.  Remove weights and reseal with lids; place in refrigerator until ready to eat.  Will keep in fridge for up to a few months.  Makes about 5 cups of salsa.


lacto-fermented salsa, strawberry-kiwi salsa, tomatoes


Annie's Basic Lacto-Fermented Strawberry-Kiwi Salsa

3 cups of diced tomatoes (no need to peel)
1 cup of chopped strawberries and peel, diced kiwi (any amounts to total 1 cup)
1/2 cup diced onion
1/4 cup diced green bell pepper
3 cloves garlic, minced
4 Tablespoons whey
2 Tablespoons fresh lime juice
2 Tablespoons sugar (optional)
1 Tablespoon sea salt
2 teaspoons finely chopped cilantro (optional)
1 teaspoon ground cumin
1/2 teaspoon dried oregano leaves
1/4 teaspoon chili powder
1/8 teaspoon black pepper
Finely diced jalapeno pepper - to taste

Combine all ingredients in a large bowl.  Adjust amount of jalapeno and/or spices to taste.  Ladle into clean wide mouth pint canning jars.  Press vegetables down so they are under the liquid and/or use a glass weight to weigh them down.  Seal tightly with canning lid and ring.  Set on countertop at room temperature for 2-3 days, or until brine is bubbly and salsa tastes tart.  Remove weights and reseal with lids; place in refrigerator until ready to eat.  Will keep in fridge for up to a few months. Makes about 6 cups of salsa.

Thursday, June 28, 2012

Lacto-Fermented Love

More than once, my blog friend Cathy asked me if I had tried the lacto-fermented vegetables from the Nourishing Traditions cookbook.  She said they were really good.  I kept telling her no, but that I intended to try them.  Finally, a couple of months ago, I gave them a try.  Now I wonder why I waited so long.  I mean, I knew I would like them, but I had no idea how much I would love them!

Ginger carrots

Lacto-fermented veggies aren't like typical vinegar pickles.  For one thing, they don't contain any vinegar.  For another, they don't need to be canned (water-bath processed) like traditional pickles do.  And finally, they have probiotic properties that are good for your digestive system.

Lacto-fermented veggies taste different than vinegar pickles.  The veggies are raw, so they stay crunchier (the exception possibly being cucumbers) and the brine is, in my opinion, more mellow.  The flavor develops with age, so the young pickles you taste after three days of fermentation on your kitchen counter will not taste the same after three weeks in your refrigerator.  Well, that's what I've read, anyway, but I can't imagine them lasting three weeks in our refrigerator.

Lacto-fermenting is also an easy process.  Canned pickles aren't difficult, but L-F pickles are way easier.  Just chop veggies and let them sit in a brine at room temperature for a few days.  Nothing could be simpler.

So far, I've made lacto-fermented radishes, turnips, dilled celery, ginger carrots, coriander carrots, plain sauerkraut, caraway sauerkraut, spicy cortido (Latin American sauerkraut) and one jar of a wonderful mix of all of those leftover kraut flavors.  Shane and I agree that the radishes are our favorite so far.

Two jars of turnips, one of ginger carrots, and one of radishes

Shane has said a couple of times that the ferments are his very favorite way to eat veggies.  I have grilled him, asking if they are better than corn on the cob, or fresh tomato slices or a nice ripe avocado with a touch of sea salt, which are all favorites around here.  He wouldn't say one way or another, which leads me to believe it's a close race.

As for me, I crave these veggies.  It's not unusual for me to spoon out a quarter cup or so to just eat by themselves, but what I really like -- a lot -- is to spread a couple of slices of homemade bread with some real butter and use any of the fermented vegetables as a sandwich filling.  These sandwiches taste yummy to me, but what's more, my body seems to be calling for them.  I definitely don't mind answering.

I know a couple of readers are already trying these:  Lisa at Easy Frugal Living was fermenting some carrots not long ago, and both the kraut and turnip ferments are very similar to the beginning stages of Patti, The Osage Bluff Quilter's turnip kraut recipe.

Lacto-fermented veggies, cultured food, cortido
Plain kraut, caraway kraut, cortido and a jar of all of them mixed

If you're interested in trying lacto-fermented veggies for yourself, don't be intimidated or think you need to do a big batch.  Here's all you do:

1) Clean and peel your veggies of choice.  Sturdy root vegetables work well, as does cabbage, but don't be afraid to try zucchini, onions, peppers or other vegetables.  Once the veggies have been cleaned and peeled, dice them or shred them as desired.  If diced, you probably don't want pieces bigger than 1/2".

2) Place prepared veggies in a clean canning jar.  Wide mouth works best, I think, and either quarts or pints can be used.  Fill about 3/4 of the way, or maybe a little more.  Add any fresh or dried herbs you might want at this point.

3) Mix a brine.  For every cup of purified water (filtered, distilled or spring water all work, just not chlorinated tap water), stir in 1 tablespoon of sea salt and 4 tablespoons of whey.  I usually have whey left over from making yogurt or kefir cheese.  If you need whey, you can strain plain yogurt or sour cream to get enough...or you can buy whey at the health food store...or you can do without it by adding an additional tablespoon of sea salt.

4) Pour the brine over the veggies, making sure they are completely submersed.  You can use a wooden spoon to press them down into the brine, or you can do what I do and weigh them down with a simple glass (not lead crystal!) votive cup that I bought at a craft store. You can also buy canning weights on eBay.  Some people don't weigh down their ferments, and others prefer using air-locks or special fermenting vessels.  This is what happens to work for me right now.

Simple glass votive cup for weighing down veggies

5)  Cover the jar tightly with a canning flat and ring and let the veggies sit on your counter at room temperature for about 3 days.  After three days, open the jar (it might pop just a little when you do) and remove the votive holder.  Taste the yummy fermented goodness.  It will be really salty and a little tart.  Over time, these flavors will blend and mellow. 

6)  Eat the veggies now or store in the refrigerator for up to several months.


To make sauerkraut, the method is almost the same:  Instead of dicing the cabbage, it needs to be shredded.  I do this by hand, with a knife, rather than with a food processor.  Instead of making a brine with water, just add the salt and whey directly to the shredded cabbage.  Put it all in a large bowl and pound with a wooden mallet of some sort until the cabbage releases it's juices.  I use the wooden part of a food mill that looks like this:


When there is enough liquid, spoon the cabbage and liquid into the jars and proceed as above.

As usual, I'm no expert, but if you have any questions about lacto-fermenting, I'll try to find an answer for you.

Tuesday, June 19, 2012

Kefir Chocolate Ice Cream

kefir ice cream

Shane and I really enjoy all of the cultured (fermented) foods I've been making, but getting Kat on board has been more difficult.  This frozen treat made with dairy kefir worked wonders with her.  Because kefir has a tangy taste, this dessert reminds me of the flavor of chocolate cheese cake.

This ice cream has raw eggs in it, but I don't heat the kefir mixture because it would negate the probiotic properties.  I get pastured eggs from a local farmer, so I am not concerned that they are raw in this dessert. 


Kefir Chocolate Ice Cream

2 cups plain dairy kefir
1 cup kefir cream (kefir made with cream) or
     1/2 cup kefir cheese (kefir with the whey drained off, leaving a thick spreadable cheese)
2 teaspoons vanilla extract
2 eggs
3/4 cup sugar (preferably organic)
1/3 cup cocoa powder (preferably organic)

Combine all ingredients in a blender and blend until smooth.  Our into the container of your ice cream maker and freeze according to the manufacturer's directions.

Makes about 3-1/2 cups.

Friday, May 11, 2012

Adventures in Sourdough - Part Two - Cookies

I found these two recipes for sourdough cookies at Common Sense Homestead.  I decided not to do a comparison with different flours; these are relatively small batches of cookies, but we still didn't need three batches sitting around.

For these I decided on Laurie's second recipe, which includes oatmeal.  I used my unbleached white flour starter, and used mixed flour (half white, half whole wheat) for the cookies.  I did not include raisins since my family doesn't like them cooked in things (although we'll eat them out of hand without problem).  I did include some milk chocolate chips, but only about 1/2 a cup.  I used organic cane crystals as my sugar choice.

These cookies take some planning, and due to lack of that, I only let the sponge ferment for six hours instead of the stated "eight or more".  They turned out just fine, IMO, although they may not offer all the benefits of full-fermentation. 

I used silicone mats in my pans and made two trays full.  To fill one, I used my small cookie scoop (approx. 1/8 cup) and on the second I used my medium scoop (about 1/4 cup).  They are baked up well, but because the cookies are soft and the medium ones spread to about four inches in diameter, they tended to break and crumble when picked up.  So, I recommend using the smaller scoop.

I baked these after supper last night, and thought at first that I didn't like them.  But I was very full from our meal, so I decided (in the name of sourdough science of course) to try another one this morning with my morning coffee.  The cookies are soft and moist, which is the way I prefer mine.  They did stick together, though, which resulted in the less-than-beautiful picture you see here:


My final and official opinion is that the cookies are very good!  Kat agrees.  No opinion from Shane; I don't think he has tried them yet.

This recipe was just what I needed to quell my doubts about using sourdough starters.  With this success, I'm more hopeful about trying other sourdough recipes.  I'll post them when I do.

Tuesday, May 8, 2012

Adventures in Sourdough - Part One - Starter and Bread

Be forewarned that this "experiment" definitely falls under the heading of haphazard homesteading.  I think I jumped into this without being properly prepared.  Meh.  What else is new?

Last week I followed along with Mamal Diane in making some sourdough starters by catching wild yeast, and then baking with the starter.

This was an experiment of sorts, as we each made three starters:  one with whole wheat flour, one with white flour, and one with a 50/50 mix of whole wheat and white flours.

Here is how the starters looked on the first day:


They are each just a mixture of 1/4 cup filtered water and 1/4 cup flour.  Each day, I added 1/4 cup filtered water and 1/4 cup flour to each jar, and set them up on a shelf in our living room.  Why the living room?  Because I have both kombucha and water kefir culturing in the kitchen already.  Wild yeasts can cross-culture, and with two already in the kitchen, I didn't want to add another.  I could have cultured the sourdough outside, but we had a lot of rain when I first started them, so I didn't want to do that, either.

I also read that it only takes 24-48 hours to catch the yeast for the starter, but I was following Diane's lead.  I wanted to do it the way she did, so we could compare notes fairly.

After the first day, they didn't really have much of an odor, but by the second day, they were starting to smell sour.  As the week progressed, they got downright stinky.  The second day also seemed to be the day they were most bubbly, and when that dissipated, I wondered what kind of results I'd get.  I've read that my part of the country (western Missouri) isn't known for strong wild yeast.  Not one to let a little technicality like that stop me, I pressed on.

By the 4th or 5th days, the whole wheat and mixed starters were smelling almost fruity, kind of like apple cider.  The white flour starter was still stinky.  But all were nice and bubbly again.

It wasn't until the 8th day that I mixed up the "sponges", per this recipe that Mamal Diane had linked. I decided for my first round of baking I would use the white flour starter to make three batches - one with white flour, one with a mix of white and wheat flours, and one with whole wheat flour.  That way I thought I'd be able to tell how the starter developed each of the types of flour.

Here are the freshly mixed sponges, with whole wheat on the left, white on the right, mixed in the middle.


The sponge needed to sit overnight, so I was able to bake yesterday.  Here is what the whole wheat sponge looked like after about 15 hours at room temp.


This is the whole wheat sponge poured out onto the floured counter top.  It's also where I became confused by the recipe.  It said to work the flour in, but it didn't say how much.  So I guessed, based on my previous bread-baking experience.  I didn't measure, I just worked in the flour until the dough felt right to me.


Here are the loaves after baking.   Again, whole wheat is on the left, white is on the right, mixed is in the middle.


And here they are after cutting.  Same order. 


Upon tasting, they are all fairly sour. The texture was dense.  I'd hoped for a more porous texture, so maybe next time I'll work in a little less flour.  The white loaf just tastes sour, while the wheat loaf tasted like sourdough and raisin bran cereal.  The mixed loaf had a nicer flavor, but I thought the crust was too thick on all of them. Overall, this isn't quite what I'm looking for.

But, surprise!  Kat loves it!  We used the bread for pulled pork BBQ sandwiches last night, and then after supper, she asked for more bread.  And I heard no complaints from Shane, either, and he is not someone I'd consider a sourdough fan.

I have lots of starter left, so I'll be trying more sourdough recipes for bread, waffles and other baked goods, comparing all three kinds of flour when I do.  However, unless I stumble upon a recipe we all love, I'm not going to feed these starters to keep them going.  I think I'll try a 48-hour starter to see if that's something I like better.

Stay tuned.  I'll be making science in the kitchen again soon!

Thursday, May 3, 2012

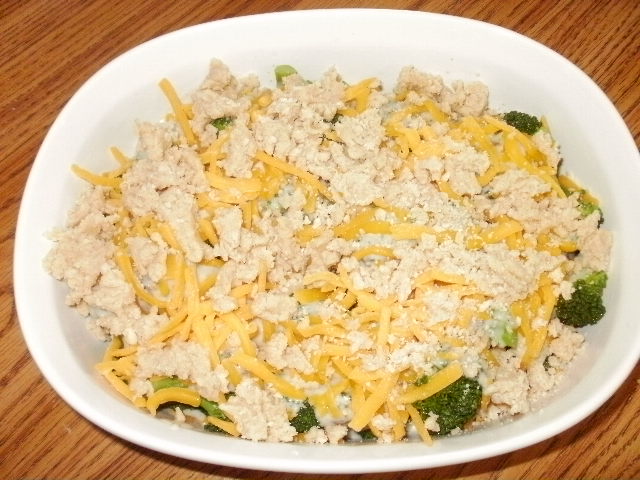
Remaking An Old Favorite - Creamy Broccoli Bake


When I was in my early 20s, I found a recipe called Bisquick Creamy Broccoli Bake.  I really loved the recipe, but I guess I took it to one too many family gatherings and one of my sisters told me to lay off  it for a while.  I continued to make it now and then over the years, but as I started making more and more food from scratch, it fell out of favor with me. In addition to Bisquick, the original recipe also called for margarine and canned cream of mushroom soup -- I don't buy any of those things anymore.

For some reason last week, I remembered the recipe and how much I used to like it.  So I decided to remake it with what I think are healthier ingredients.  I was surprised at how similar in flavor it was to the original.


Annie's Healthier Creamy Broccoli Bake


Approximately 1 pound fresh broccoli florets
1/2 teaspoon salt
2 to 4 large mushrooms, chopped (I used Baby Bellas, but any mushrooms would work fine)
3 Tablespoons butter
salt to taste
1/4 cup flour (mix of 50% white/50% whole wheat)
1 cup of milk
1/2 to 1 cup shredded cheddar cheese
1/2 cup flour (mix of 50% white/50% whole wheat)
1 teaspoon baking powder
1/4 teaspoon salt
2 Tablespoons butter, slightly softened

Spray 2-quart casserole dish with pan spray.

Place broccoli florets and 1/2 teaspoon salt in a medium saucepan and add enough water to cover.  Bring to a boil and boil for 2-3 minutes or until broccoli is just beginning to get tender.  Remove from heat and drain.  Place in prepared casserole dish.


In a small pan, saute chopped mushroom pieces in 3 Tablespoons of butter until tender.  Add salt to taste.  Stir in 1/4 cup of flour and cook for about 2 minutes.  Whisk in milk and cook over medium heat until mixture thickens.  It should be similar in consistency of a thick gravy; add more milk if necessary to achieve this consistency.  Pour mushroom sauce over broccoli.


Sprinkle shredded cheese over broccoli and mushroom sauce.


In a separate bowl, combine 1/2 cup flour, 1 teaspoon baking powder and 1/4 teaspoon salt (or use 1/2 cup self-rising flour) with 2 tablespoons butter.  Use a fork to combine until mixture is crumbly.  Sprinkle mixture over broccoli, sauce and cheese in dish.


Bake, uncovered, for 30 minutes or until crumb mixture is golden brown.

Makes 4 to 6 servings.

Tuesday, April 24, 2012

Amazing 100% Whole Wheat Bread

I found this recipe for 100% Whole Wheat Bread recently, and since it promised to rise just as light and fluffy as white bread, I had to try it.  It ended up rising better than some white or mixed white/wheat loaves I've tried.

Free Range Mama at My Healthy Green Family wrote that she had doubled the recipe straight across, so I felt confident in halving it straight across for my first batch.  I wanted a smaller batch for my first attempt in case we didn't like it for some reason.  Next time I will probably make the 4-loaf batch and freeze a couple loaves. 

After halving the ingredients, I followed the recipe as written except that I didn't hand-knead for 15 minutes.  I have a Bosch Universal mixer, so I kneaded it in the mixer for 5 minutes.  If you are using a KitchenAid mixer, I'd suggest kneading for around 10 minutes.

I'm in the market for a grain mill so I can grind wheat at home, but until then, I use 100% white whole wheat flour made from soft white wheat. Here's my version of the recipe, which makes two loaves:


100% Whole Wheat Bread

3 cups of 100% whole wheat flour
Up to 3/4 cup of seeds (optional - I used 1 Tablespoon each of chia, sunflower and sesame seeds)
2-1/2 cups tepid water
2-1/4 teaspoon dry yeast
1/4 cup warm water (at room temperature; make sure it is not warm)
1 Tablespoon honey
1/2 cup lukewarm water (make sure it is not too warm)
3 Tablespoons butter, melted, then cooled to room temperature
1 teaspoon salt
Approximately 3 cups additional 100% whole wheat flour

Combine 3 cups of flour with seeds and 2-1/2 cups water in large mixing bowl or in bowl of stand mixer.  Make sure all flour is moistened.  Batter should be neither dry nor watery.  Add additional flour or water by the tablespoonful until a balanced consistency is reached.  Cover with a dish towel, or if using a Bosch mixer, attach both lids.  Let flour mix sit for 30 minutes to 2 hours.

Melt 3 Tablespoons butter, then set it aside to cool to room temperature.

About 30 minutes before you are ready to mix and knead the dough, combine 1/4 cup warm water, 1 Tablespoon honey and 2-1/4 teaspoons dry yeast in a 2-cup measuring cup.  (Make sure you use a cup at least this large as the yeast mixture will -- hopefully -- rise and expand quite a lot.)  Give this mixture a quick stir and set it aside.

Once the flour mixture has soaked and the yeast mixture has proofed, add yeast mixture, 1/4 cup lukewarm water, the room temperature melted butter and 1 teaspoon salt to the flour mixture; mix well.  Add 2-1/2 to 3-1/2 cups of 100% whole wheat flour and combine until dough pulls away cleanly from the sides of the mixing bowl.  Knead for 5 minutes in the Bosch mixer, for approximately 10 minutes in a KitchenAid mixer, or 15 minutes by hand.  Dough should not be sticky, but should be very soft by the time you are done kneading.  I add little bits of flour as needed, but I prefer to err on the side of too little flour rather than too much.

Place kneaded dough in a large well-oiled bowl.  Cover with a damp dish towel and set to rise until double, up to 2 hours.  I placed mine inside my microwave oven and it took an hour to double.

Once dough has doubled, scrape it (and any oil that was in the bowl) onto the counter.  Punch down and knead by hand a few times.  I prefer using the oil in the bowl and on the dough to keep the dough from sticking rather than dusting the counter with additional flour that might make the dough too dry. 

Divide the dough and shape it into two loaves.  Oil your loaf pans if necessary (mine are non-stick so I don't) and place dough in pans.  Set them to rise until double, up to 2 hours.  I placed mine back in the microwave, and instead of covering them with a cloth, I placed a small bowl of warm water in with them.  They took 30 minutes to double.

When loaves have nearly doubled, heat oven to 350°F.  Once loaves have doubled, bake for approximately 40 minutes or until internal temperature reaches 200°F.  Remove pans from oven and cool the bread, in the pans, on wire racks for 10 minutes.  Remove from pans and completely before slicing.

I store the loaf I am using by wrapping it in plastic and leaving it on the counter.  I double-wrap the cooled extra loaf and freeze it until needed, then thaw it on the counter top.  I find it more convenient to slice the bread before freezing it, but don't always manage to do so.

This post is being shared at the Hearth and Soul Hop with Premeditated Leftovers, at The Gathering Spot #1 with Mamal Diane, and at Delicious Dish Tuesday with Full-Time Mama.

Monday, April 2, 2012

Weekend Randomness

  • To further our adventures in healthy, cultured foods, we picked up some water kefir grains from a local craigslister who was giving them away.  I'll be posting about water kefir and the other cultured foods we've been making sometime soon.
  • If you have noticed (or notice soon) one fewer follower on your Google Friends Connect counter, that's probably me.  Don't worry!  I'm still using Google Reader to follow you, but just not with GFC.  Not all blogs can be followed with GFC, so I'm just trying to get all my subscriptions to work the same way.  You know, to make my life a little less complicated.
  • There was much excitement at my daughter's house on Thursday of last week.  My son-in-law was in the attic for some reason on Thursday morning, stepped off the wood planks up there, and dropped in on their roommate by falling through the ceiling.  He's bruised about the ribs, but otherwise fine (paramedics were called and checked him out).  Shane went yesterday to help my daughter and SIL repair the ceiling so the roomie can move back in.
  • I spent some time over the weekend herding cats.  Yep, it's about as much fun as you think it would be. One of our cats (we think it was Siesta) managed to release the screen on our new back door and then Tuxie and Swiper got out. You'd think as much as that thing cost, it would be cat-escape-proof.   I managed to get them in, but the next day, Siesta and Tuxie managed to escape into the garage and were heading down the stairs to the basement.  I guess cats get cabin fever, too, but this nonsense has got to stop!
  • Our garden is coming along nicely; we've been eating asparagus almost daily for a week or more, and soon lettuce and radishes will be ready for salad.  I plan to go out later today to do some thinning and to get some photos for tomorrow's garden post.
  • I mentioned on Friday that I was going to work on a little crafty something to go with Kat's new dress, but I didn't get to that over the weekend.  I'll post it as soon as I get it done; either this afternoon or tomorrow.
  • I left the windows down in the van yesterday afternoon, thinking I'd be running another errand.  When that didn't happen, I forgot to go out and roll the windows up until the wee hours of the morning.  It was still 70° at 3:30 a.m., on April 2, in Missouri.  That's crazy warm for this early in the year!
  • I didn't just wake up and remember the van windows were down.  I didn't rest much at all last night, and it was just one of many odd things that came to mind as I was trying to get to sleep.  I feel -- and no doubt, look -- like (insert uncomplimentary/unpleasant descriptive phrase of choice) this morning, so I'm off to try to get a nap.  Probably won't happen with all I should be doing instead, but I'll be in much better shape if I can. 

What's new in your world?


Tuesday, March 13, 2012

Whole Wheat Blender Pancakes

I'm thinking about making these for breakfast this morning, so I decided to pull the recipe from my old blog and post it here for anyone who would like to try it.  And trust me...you would like to try it.


**********


Whole Wheat Blender Pancakes

1 cup milk
3/4 cup wheat kernels (aka wheatberries)
2 eggs
2 Tablespoons honey or sugar
1/4 cup oil
2 teaspoons baking powder
3/4 teaspoon baking soda
1/2 teaspoon salt

Put milk and wheat berries in blender.  Blend on high for about 4 minutes.

Add remaining ingredients and blend a few seconds until mixed. Batter will be thinner than most pancake batters.

Pour batter onto lightly oiled, hot griddle or skillet. Cook until bubbles form and begin to break, then flip and cook for about two minutes on other side.

Serve with butter and syrup or honey.

Makes approx. ten 5-inch pancakes.

Source: Pleasant Hill Grain Company


This post is being shared at Hearth and Soul Hop with Premeditated Leftovers and Delicious Dish Tuesday with Full Time Mama.

Thursday, March 8, 2012

Homemade, Healthier Potato Chips

I know you can't eat just one.

I found this post about microwave potato chips at From Blah To Ta-Da yesterday and just had to give these chips a try.  And after trying several variations, I just had to share them with you.

These are so easy.  To make basic potato chips, wash a large potato, but don't peel it. Slice it really thin.  If you have a mandolin slicer, go for it.  If not, try to slice the potatoes 1/6th inch thin or thinner for delicately crispy chips and not more than 1/8 inch thick for crunchier, heartier chips.

Once sliced rinse in cool water several times or soak for about 10 minutes.  This is to remove the starch.  Dry potato slices on clean dish towel.  Drying makes them cook crisper and keeps them from sticking to the paper towels.

Line a microwave safe plate with a couple of layers of paper towels or parchment paper.  Place slices on the plate, making sure they don't overlap or else they will stick together.  If desired, you can spray or brush them very lightly with the oil of your choice, but it is totally not necessary!  Sprinkle with salt or other seasoning at this point.

Microwave on full power for 3 minutes.  Turn chips and microwave at 50% power for 3 more minutes.  Watch your chips as they cook.  In my oven, it only took 2 more minutes on 50% power to finish them.  The one plateful that I sprayed lightly with oil cooked more quickly and did not need to be turned over at all.

Let cook slightly, then enjoy.  If you have any left (you won't!) they can be stored for a few days in an airtight container.

Just one large potato made four platefuls of chips, so you know they have to be a thrifty snack, too.  If I wasn't convinced before that the big chip companies are ripping us off, I am now!

I made four different flavor variations:
  • Lightly salted (no oil)
  • BBQ (I used a "firecracker rub" for ribs that I had in the cabinet, and no oil)
  • Plain with a sprinkling of nutritional yeast (no oil)
  • Sea salt and cracked black pepper (lightly sprayed with peanut oil)

They were all delicious, but I think we both liked the salt and pepper flavor the best.  Shane likes the salt and vinegar chips you can buy in the store, so he's asked me to come up with that variation.  If I do, I'll post those, too.


This post is being shared at Hearth and Soul Hop with Premeditated Leftovers and Delicious Dish Tuesday with Full Time Mama.
Related Posts Plugin for WordPress, Blogger...