An odd but decidedly cool thing happened in our family recently.
A couple of weeks ago, I entered a book giveaway for a book about foraging called Dandelion Hunter: Foraging the Urban Wilderness. I was lucky enough to win, and I started reading it last week.
At about the same time, without having discussed the book I won, Shane joined a Facebook group centered on foraging Missouri wild edibles.
Also at the same time, without any of us knowing what the others were doing, my son-in-law began foraging for wild edibles in his own neighborhood.
While we've each eaten the occasional berries, nuts, wild mushroom or wild greens, as far as I know, none of us have ever had a driving interest in foraging wild edibles for either culinary or medicinal uses.
Some say there are no coincidences, so I'm taking this as a sign we're on the right track in taking up this line of study, whether for fun now or for more serious reasons in some unforeseen future. Many plants and fungi can be mistaken for others, causing skin irritations, illness or even death. The way I see it, three sets of knowledgeable eyes are better than one or two.
Meanwhile, I'm beginning to believe we have a lot more to eat in our garden than we planted!
Do you forage wild edibles or do you know anyone who does? If so, are your reasons more culinary or medicinal?
Search This Blog
Showing posts with label Wild Food. Show all posts
Monday, April 15, 2013
To Forage or Not To Forage?
Posted by
Annie at Haphazard Homestead
at
6:00 AM
To Forage or Not To Forage?
2013-04-15T06:00:00-05:00
Annie at Haphazard Homestead
Family|Reading|Real Food|Simplicity|Wild Food|
Comments
Labels:
Family,
Reading,
Real Food,
Simplicity,
Wild Food
Wednesday, January 23, 2013
Pressure Cooker Venison Grand Marnier
This recipe originally came from the book "301 Venison Recipes - The Ultimate Deer Hunter's Cookbook". It's a sweeter twist on classic beef tips and gravy, and one the family really enjoyed. It called for marinating the venison for at least 4-5 hours or overnight. I didn't plan well enough in advance for that, so I decided to convert the original into a pressure cooker recipe.
I used venison stew meat, dehydrated minced onions, and a can of mushrooms, so there was no chopping involved. Feel free to use fresh onion and mushrooms, but be sure to add the mushrooms in before pressure cooking instead of after. And as always, feel free to use beef instead of venison if you like.
I had this recipe done, start to finish, in about half an hour. I also made a second batch, uncooked, to freeze. When I'm ready to serve, I can dump it into the pressure cooker (thawed and frozen) and have dinner ready in a jiffy.
Pressure Cooker Venison Grand Marnier
6 ounces Grand Marnier (or any orange liqueur - I used Triple Sec because we had some)
6 ounces orange juice concentrate
6 ounces white wine
2 cups beef stock
1 teaspoon dried basil
1 Tablespoon dehydrated minced onion
Pinch of ground rosemary
1 to 1-1/2 pounds venison, cut into thin strips or chunks (I used stew meat in about 1" cubes)
1 can mushroom pieces, or 8 oz. fresh mushrooms, chopped or quartered
6 Tablespoons butter
6 Tablespoons flour
browning sauce, such as Kitchen Bouquet
Salt and pepper to taste
Place rack in pressure cooker, and add first 8 ingredients, plus mushrooms if you are using fresh. Bring mixture to a boil over high heat, then attach pressure cooker lid.
When there is steady stream of steam emitting from pressure cooker vent, place weight on vent. When cooker begins hissing and weight rocks gently, begin timing an cook for 20 minutes. These directions are for my particular pressure cooker - for optimal safety, always follow the manufacturers directions for you own cooker.
Meanwhile, melt butter in a small pan and whisk in flour. Cook over medium-high heat for about 3 minutes to create a roux.
After 20 minutes, quickly reduce pressure by placing cooker in sink and running cold water over it. When there is no longer pressure, carefully remove lid and return cooker to stove top.
The broth may have foamed. If so, either scrape the bits off the sides and out of the cooker, or down into the broth (I prefer down and in, because there is a lot of flavor in those bits). Bring broth to a gentle boil.
Whisk in roux a spoonful at a time until lump free and as thick as desired. Whisk in small amounts of browning sauce until desired rich color is achieved.
Serve over rice, pasta or homemade noodles.
Makes about 4 servings.
I used venison stew meat, dehydrated minced onions, and a can of mushrooms, so there was no chopping involved. Feel free to use fresh onion and mushrooms, but be sure to add the mushrooms in before pressure cooking instead of after. And as always, feel free to use beef instead of venison if you like.
I had this recipe done, start to finish, in about half an hour. I also made a second batch, uncooked, to freeze. When I'm ready to serve, I can dump it into the pressure cooker (thawed and frozen) and have dinner ready in a jiffy.
Pressure Cooker Venison Grand Marnier
6 ounces Grand Marnier (or any orange liqueur - I used Triple Sec because we had some)
6 ounces orange juice concentrate
6 ounces white wine
2 cups beef stock
1 teaspoon dried basil
1 Tablespoon dehydrated minced onion
Pinch of ground rosemary
1 to 1-1/2 pounds venison, cut into thin strips or chunks (I used stew meat in about 1" cubes)
1 can mushroom pieces, or 8 oz. fresh mushrooms, chopped or quartered
6 Tablespoons butter
6 Tablespoons flour
browning sauce, such as Kitchen Bouquet
Salt and pepper to taste
Place rack in pressure cooker, and add first 8 ingredients, plus mushrooms if you are using fresh. Bring mixture to a boil over high heat, then attach pressure cooker lid.
When there is steady stream of steam emitting from pressure cooker vent, place weight on vent. When cooker begins hissing and weight rocks gently, begin timing an cook for 20 minutes. These directions are for my particular pressure cooker - for optimal safety, always follow the manufacturers directions for you own cooker.
Meanwhile, melt butter in a small pan and whisk in flour. Cook over medium-high heat for about 3 minutes to create a roux.
After 20 minutes, quickly reduce pressure by placing cooker in sink and running cold water over it. When there is no longer pressure, carefully remove lid and return cooker to stove top.
The broth may have foamed. If so, either scrape the bits off the sides and out of the cooker, or down into the broth (I prefer down and in, because there is a lot of flavor in those bits). Bring broth to a gentle boil.
Whisk in roux a spoonful at a time until lump free and as thick as desired. Whisk in small amounts of browning sauce until desired rich color is achieved.
Serve over rice, pasta or homemade noodles.
Makes about 4 servings.
Posted by
Annie at Haphazard Homestead
at
6:00 AM
Pressure Cooker Venison Grand Marnier
2013-01-23T06:00:00-06:00
Annie at Haphazard Homestead
Cookbooks|Frugal Living|Recipes|Wild Food|
Comments
Labels:
Cookbooks,
Frugal Living,
Recipes,
Wild Food
Friday, January 11, 2013
Italian Venison (or Beef) Steak
I was hoping to come up with something clever, witty, and generally brilliant today, so here....have a recipe.
I found this recipe in a cookbook called "301 Venison Recipes - The Ultimate Deer Hunter's Cookbook". If you don't eat venison, use beef (or pork or chicken). This recipe is similar to Veal Parmesan and was great served over a bed of spaghetti. Kat asked me to put it on "the make it again list". Most cuts of venison will work, since the meat is tenderized, but if you have backstrap or tenderloin, I'd recommend using those.
Italian Venison Steak
4 venison cubed steaks or tenderized round steaks (about 2 pounds)
1/4 cup oil
1/2 cup flour or crushed crackers (I used whole wheat flour seasoned with salt and pepper)
1 egg, beaten
1 jar (26 ounces) pasta sauce (I used our home-canned sauce)
1 cup grated Parmesan cheese (I used provolone with just a bit of Parmesan)
Preheat oven to 350°F. Slowly heat oil in large oven-proof skillet. Dip steaks in egg, then in flour mixture. Brown on both sides in hot oil. Drain oil from pan; return steaks to pan. Spoon pasta sauce over steaks. Bake, covered, for 45 minutes (use foil if your skillet has no lid). Top with cheese and return to oven for 5 minutes to melt. Makes 4 servings.
I found this recipe in a cookbook called "301 Venison Recipes - The Ultimate Deer Hunter's Cookbook". If you don't eat venison, use beef (or pork or chicken). This recipe is similar to Veal Parmesan and was great served over a bed of spaghetti. Kat asked me to put it on "the make it again list". Most cuts of venison will work, since the meat is tenderized, but if you have backstrap or tenderloin, I'd recommend using those.
Italian Venison Steak
4 venison cubed steaks or tenderized round steaks (about 2 pounds)
1/4 cup oil
1/2 cup flour or crushed crackers (I used whole wheat flour seasoned with salt and pepper)
1 egg, beaten
1 jar (26 ounces) pasta sauce (I used our home-canned sauce)
1 cup grated Parmesan cheese (I used provolone with just a bit of Parmesan)
Preheat oven to 350°F. Slowly heat oil in large oven-proof skillet. Dip steaks in egg, then in flour mixture. Brown on both sides in hot oil. Drain oil from pan; return steaks to pan. Spoon pasta sauce over steaks. Bake, covered, for 45 minutes (use foil if your skillet has no lid). Top with cheese and return to oven for 5 minutes to melt. Makes 4 servings.
Posted by
Annie at Haphazard Homestead
at
6:00 AM
Italian Venison (or Beef) Steak
2013-01-11T06:00:00-06:00
Annie at Haphazard Homestead
Cookbooks|Recipes|Venison|Wild Food|
Comments
Monday, November 19, 2012
Grinding Away
I know I haven't been around much. Here's why:
- Between Thursday of last week and yesterday, we processed and froze 84 pounds of venison.
- We killed our meat grinder.
- I made Shane a cake for his birthday, which was yesterday. I used this recipe, but made some changes to include cocoa and little molasses.
- I set up some Spicy Cranberry Relish to lacto-ferment. It should be done by Thursday.
- I made Make-Ahead Gravy for Thursday's feast.
- After using what I needed for the gravy, I canned 4 pints of perpetual chicken bone broth.
- I zested and juiced some lemons and limes for future recipes.
- I'm making these French fries to go with tonight's supper. I'm trying the twice-fried or double-fried method this time. These are between fryings. If you are interested, do a Google search. There are WAY too many results to link just one.
- I managed to work in a little bit of laundry and housework between other jobs.
- Somehow, I managed to find time to plan meals until the end of the year. Mostly just the main dishes, but it's a good starting point for more busy days ahead.
- And just for fun, we had dinner with some friends on Saturday evening.
I'm on a roll! If you don't hear from me by Black Friday, send a search party.
- Between Thursday of last week and yesterday, we processed and froze 84 pounds of venison.
- We killed our meat grinder.
- I made Shane a cake for his birthday, which was yesterday. I used this recipe, but made some changes to include cocoa and little molasses.
- I set up some Spicy Cranberry Relish to lacto-ferment. It should be done by Thursday.
- I made Make-Ahead Gravy for Thursday's feast.
- After using what I needed for the gravy, I canned 4 pints of perpetual chicken bone broth.
- I zested and juiced some lemons and limes for future recipes.
- I'm making these French fries to go with tonight's supper. I'm trying the twice-fried or double-fried method this time. These are between fryings. If you are interested, do a Google search. There are WAY too many results to link just one.
- I managed to work in a little bit of laundry and housework between other jobs.
- Somehow, I managed to find time to plan meals until the end of the year. Mostly just the main dishes, but it's a good starting point for more busy days ahead.
- And just for fun, we had dinner with some friends on Saturday evening.
I'm on a roll! If you don't hear from me by Black Friday, send a search party.
Posted by
Annie at Haphazard Homestead
at
1:50 PM
Grinding Away
2012-11-19T13:50:00-06:00
Annie at Haphazard Homestead
Canning and Preserving|Cultured Foods|Family|Frugal Living|Holidays|Homesteading|Simplicity|Wild Food|
Comments
Labels:
Canning and Preserving,
Cultured Foods,
Family,
Frugal Living,
Holidays,
Homesteading,
Simplicity,
Wild Food
Monday, June 11, 2012
How To Make Dairy Kefir
In my slow, but ongoing, series of posts about fermented foods, today I want to write about milk kefir (pronounced keh-FEAR, or sometimes KEE-fur). Of the three fermented drinks we currently make and drink (kombucha, water kefir and dairy kefir), this is my favorite.
For anyone who is not familiar with milk kefir, also called dairy kefir or just kefir, it is a cultured (fermented) food item similar to a thin yogurt or buttermilk. It is full of probiotics and, at least to me, is quite tasty. I think it is milder in flavor than homemade yogurt and find it much easier to make. It is a good substitute in any recipe that calls for buttermilk, and can even replace sweet milk in many recipes. If fermented a second time, usually with some kind of flavoring, it becomes slightly effervescent and even tastier, in my opinion. Best of all, it can also be used to make some great treats.
To begin, you must have a starter, which is usually called kefir grains. The starter is also known as kefir pearls, kefir scoby, as well as by a variety of other names. The starter does not come from grain at all, but rather from a combination of yeasts and (beneficial) bacteria. When dehydrated, it looks like small granules (thus the name). Re-hydrated, it resembles cauliflower, but with a spongy texture.
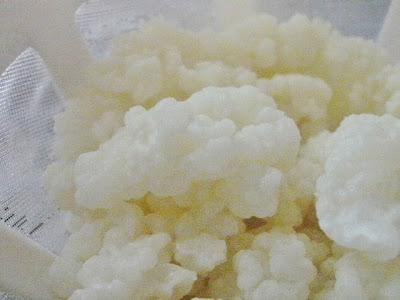
A nice lady on craigslist gave me my starter, but you can also find them for sale on a number of websites. If you are local to me and are interested, I can probably set you up with a starter as these things tend to reproduce with each batch of kefir.
Once you've acquired a starter, you combine it in a clean glass vessel (canning jars are good) with fresh milk. I've read that raw is best, but I've yet to get my hands on any, so I use regular (NOT ultra-pasteurized) whole milk. I suppose you can use milk with a lower fat content, but I think whole milk is recommended. The ratio is 1 tablespoon of starter grains to 1 cup of milk. I usually make several cups at a time, either in multiple jars or in a gallon glass jar.
Once combined, cover your jar with a clean cloth or coffee filter and secure it with a rubber band. This will keep dust, gnats and the like out of the kefir. Set the jar on the counter, at room temperature and several feet away from any other cultured foods you have going, and let it sit for 12-24 hours. You will know it is working when you see small pockets of whey (clear, yellowish fluid) develop both on top and throughout the milk.
You'll know it is done when the milk has thickened to the consistency of thin yogurt or buttermilk, and tastes slightly tart. The longer you let the kefir culture, the more tart it will be. When it is as tart as you like it, strain the kefir through a plastic strainer or a fine colander to remove the grains. At this point you can start another batch with the grains. The liquid kefir is now ready to drink or use in recipes. Just store it in the fridge in a covered jar to slow the fermentation process. Better yet, it can be flavored and fermented a second time for added flavor. It's my understanding that the second fermentation also increases the B vitamin content significantly.
To do a second fermentation, just pour the kefir into clean jars (without any of the grains in it), and cover tightly. Let sit on the counter for another 12-24 hours (the warmer the room, the less time it will take) or until you see whey forming again, this time at the bottom of the jar. Once that happens, move the jars to the refrigerator until you are ready to use it.
You can also flavor your kefir for the second fermentation by adding sweeteners or fruit. Two of my favorites have been pure maple syrup with vanilla, and slices of organic oranges (rind and all) with a little organic sugar. I've also successfully used crushed and sweetened strawberries, strawberry-rhubarb syrup, vanilla extract with sugar, lemons, limes, and crushed blueberries. Once the second fermentation is complete, the result is a lightly fizzy, sweet-tart and fruity beverage that, while made with milk, is not heavy at all.
If you like, you can replace the milk in kefir with coconut milk. The taste is a lot different, but if you like coconut, it's very pleasant.
I've also used kefir, both single- and double-fermented, to make healthy and yummy ranch dressing. I just use it to replace the buttermilk in this recipe.
Sometimes, if you let the kefir ferment too long, either during the first or second fermentation, it can separate into defined layers of curd and whey. If that happens, all is not lost. The simplest thing to do with it is just stir it back together. It is not as creamy as it could be, but it is still flavorful and perfectly safe to drink.
Another option is to strain the whole thing through a plastic mesh strainer, completely separating the curd from the whey. The whey can be used in baking or for lacto-fermented veggies (recipes to come), and the curd can be used as a cream cheese or sour cream substitute. The kefir curd (kefir cream) is also an ingredient in this:
I promise it will be my next cultured food recipe, and I promise you'll love it.
For anyone who is not familiar with milk kefir, also called dairy kefir or just kefir, it is a cultured (fermented) food item similar to a thin yogurt or buttermilk. It is full of probiotics and, at least to me, is quite tasty. I think it is milder in flavor than homemade yogurt and find it much easier to make. It is a good substitute in any recipe that calls for buttermilk, and can even replace sweet milk in many recipes. If fermented a second time, usually with some kind of flavoring, it becomes slightly effervescent and even tastier, in my opinion. Best of all, it can also be used to make some great treats.
To begin, you must have a starter, which is usually called kefir grains. The starter is also known as kefir pearls, kefir scoby, as well as by a variety of other names. The starter does not come from grain at all, but rather from a combination of yeasts and (beneficial) bacteria. When dehydrated, it looks like small granules (thus the name). Re-hydrated, it resembles cauliflower, but with a spongy texture.
| Kefir culture (starter). |
A nice lady on craigslist gave me my starter, but you can also find them for sale on a number of websites. If you are local to me and are interested, I can probably set you up with a starter as these things tend to reproduce with each batch of kefir.
Once you've acquired a starter, you combine it in a clean glass vessel (canning jars are good) with fresh milk. I've read that raw is best, but I've yet to get my hands on any, so I use regular (NOT ultra-pasteurized) whole milk. I suppose you can use milk with a lower fat content, but I think whole milk is recommended. The ratio is 1 tablespoon of starter grains to 1 cup of milk. I usually make several cups at a time, either in multiple jars or in a gallon glass jar.
| Starter in the jars and ready for milk. |
| Milk. Not raw or organic, but local. |
Once combined, cover your jar with a clean cloth or coffee filter and secure it with a rubber band. This will keep dust, gnats and the like out of the kefir. Set the jar on the counter, at room temperature and several feet away from any other cultured foods you have going, and let it sit for 12-24 hours. You will know it is working when you see small pockets of whey (clear, yellowish fluid) develop both on top and throughout the milk.
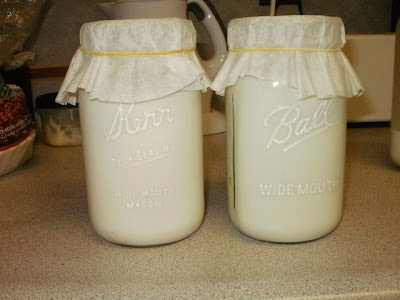
| Kefir, ready for the first fermentation. |
You'll know it is done when the milk has thickened to the consistency of thin yogurt or buttermilk, and tastes slightly tart. The longer you let the kefir culture, the more tart it will be. When it is as tart as you like it, strain the kefir through a plastic strainer or a fine colander to remove the grains. At this point you can start another batch with the grains. The liquid kefir is now ready to drink or use in recipes. Just store it in the fridge in a covered jar to slow the fermentation process. Better yet, it can be flavored and fermented a second time for added flavor. It's my understanding that the second fermentation also increases the B vitamin content significantly.
To do a second fermentation, just pour the kefir into clean jars (without any of the grains in it), and cover tightly. Let sit on the counter for another 12-24 hours (the warmer the room, the less time it will take) or until you see whey forming again, this time at the bottom of the jar. Once that happens, move the jars to the refrigerator until you are ready to use it.
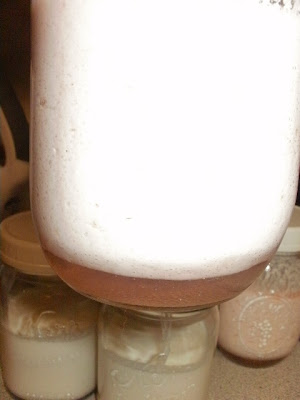
| Layer of whey forming under second-fermented kefir. |
You can also flavor your kefir for the second fermentation by adding sweeteners or fruit. Two of my favorites have been pure maple syrup with vanilla, and slices of organic oranges (rind and all) with a little organic sugar. I've also successfully used crushed and sweetened strawberries, strawberry-rhubarb syrup, vanilla extract with sugar, lemons, limes, and crushed blueberries. Once the second fermentation is complete, the result is a lightly fizzy, sweet-tart and fruity beverage that, while made with milk, is not heavy at all.
| Kefir being flavored for a second fermentation. |
If you like, you can replace the milk in kefir with coconut milk. The taste is a lot different, but if you like coconut, it's very pleasant.
I've also used kefir, both single- and double-fermented, to make healthy and yummy ranch dressing. I just use it to replace the buttermilk in this recipe.
Sometimes, if you let the kefir ferment too long, either during the first or second fermentation, it can separate into defined layers of curd and whey. If that happens, all is not lost. The simplest thing to do with it is just stir it back together. It is not as creamy as it could be, but it is still flavorful and perfectly safe to drink.
Another option is to strain the whole thing through a plastic mesh strainer, completely separating the curd from the whey. The whey can be used in baking or for lacto-fermented veggies (recipes to come), and the curd can be used as a cream cheese or sour cream substitute. The kefir curd (kefir cream) is also an ingredient in this:
| Chocolate kefir ice cream. |
I promise it will be my next cultured food recipe, and I promise you'll love it.
Posted by
Annie at Haphazard Homestead
at
12:55 PM
How To Make Dairy Kefir
2012-06-11T12:55:00-05:00
Annie at Haphazard Homestead
Cooking|Cultured Foods|Fermenting|Recipes|Wild Food|
Comments
Labels:
Cooking,
Cultured Foods,
Fermenting,
Recipes,
Wild Food
Thursday, May 17, 2012
Beef Tips and Gravy
I love trying new recipes, so for a dish to make it into heavy rotation, it has to be something we all love. I make this one about once ever 6 weeks or so.
I learned to make huge amounts of this dish when I worked for a caterer. I did the math and made it manageable for the home kitchen, and it's become a family favorite. Lately, I make it with venison; I think I like it even better that way.
Warning: Do not make this dish unless you want your house to smell amazing.
Beef Tips and Gravy
Roux (for thickening gravy):
1 stick butter
3/4 cup flour
Combine and cook over medium heat until mixture is bubbly and gives off a nutty aroma, about 3-5 minutes. Note that the darker the roux is allowed to cook, the "darker" your gravy will taste.
Set roux aside. (If all if it is not used in this recipe, you can refrigerate it for use at a later date.)
Beef Tips
1 lbs. beef, cut into 3/4-inch cubes
pan spray (I use a refillable sprayer with peanut oil or olive oil)
1 teaspoon seasoned salt
1 teaspoon garlic powder
1 teaspoon dried thyme leaves
1/2 teaspoon black pepper
1 onion, cut into chunks
mushrooms, cut into chunks (optional, as many or few as you like)
1-1/2 cups water*
1 10-ounce cans beef consomme*
browning sauce, such as Kitchen Bouquet
*I usually use 3 cups of homemade or store-bought beef broth in place of the water and consomme, although consomme does have a richer flavor, IMO.
Heat oven to 350° F.
Spray bottom and sides of oven-proof skillet or casserole dish with non-stick spray. Combine garlic powder, seasoned salt, dried thyme leaves and pepper. Sprinkle half of this mixture over bottom of pan. Place meat cubes in pan and sprinkle remaining spice mixture over the top. Bake in oven, uncovered, for 20 minutes.
Remove pan from oven. Reduce heat to 250°. Pour water and beef consomme carefully around beef cubes. Add onion and mushrooms. Cover pan, return it to oven, and let simmer gently for at least 2 hours or until meat is very tender.
Remove pan from oven and sit on top of stove. While liquids are still very hot, carefully whisk roux into liquids a spoonful at a time, until desired thickness is achieved. Gravy will be light to medium brown. If desired, stir in browning sauce, a little at a time, until deeper color is achieved.
Taste gravy and adjust seasonings to taste.
Cover and set aside until ready to serve.
Noodles:
1 8-ounce package of dry egg noodles or medium pasta shapes
olive oil
fresh or dried parsley
Cook noodles according to package directions. Drain.
Drizzle lightly with olive oil and toss to coat; this keeps noodles from sticking together.
Sprinkle with parsley flakes and toss again.
Portion noodles onto serving plates or wide shallow bowls. Top with beef tips and gravy. Serve immediately.
Makes 4 servings.
Dress-Ups:
Add 1/4 cup or so of dry red wine with the water and beef consomme for a richer flavor.
Stir 1/4 cup or so of sour cream just before serving for more of a stroganoff flavor.
I learned to make huge amounts of this dish when I worked for a caterer. I did the math and made it manageable for the home kitchen, and it's become a family favorite. Lately, I make it with venison; I think I like it even better that way.
Warning: Do not make this dish unless you want your house to smell amazing.
Beef Tips and Gravy
Roux (for thickening gravy):
1 stick butter
3/4 cup flour
Combine and cook over medium heat until mixture is bubbly and gives off a nutty aroma, about 3-5 minutes. Note that the darker the roux is allowed to cook, the "darker" your gravy will taste.
Set roux aside. (If all if it is not used in this recipe, you can refrigerate it for use at a later date.)
Beef Tips
1 lbs. beef, cut into 3/4-inch cubes
pan spray (I use a refillable sprayer with peanut oil or olive oil)
1 teaspoon seasoned salt
1 teaspoon garlic powder
1 teaspoon dried thyme leaves
1/2 teaspoon black pepper
1 onion, cut into chunks
mushrooms, cut into chunks (optional, as many or few as you like)
1-1/2 cups water*
1 10-ounce cans beef consomme*
browning sauce, such as Kitchen Bouquet
*I usually use 3 cups of homemade or store-bought beef broth in place of the water and consomme, although consomme does have a richer flavor, IMO.
Heat oven to 350° F.
Spray bottom and sides of oven-proof skillet or casserole dish with non-stick spray. Combine garlic powder, seasoned salt, dried thyme leaves and pepper. Sprinkle half of this mixture over bottom of pan. Place meat cubes in pan and sprinkle remaining spice mixture over the top. Bake in oven, uncovered, for 20 minutes.
Remove pan from oven. Reduce heat to 250°. Pour water and beef consomme carefully around beef cubes. Add onion and mushrooms. Cover pan, return it to oven, and let simmer gently for at least 2 hours or until meat is very tender.
Remove pan from oven and sit on top of stove. While liquids are still very hot, carefully whisk roux into liquids a spoonful at a time, until desired thickness is achieved. Gravy will be light to medium brown. If desired, stir in browning sauce, a little at a time, until deeper color is achieved.
Taste gravy and adjust seasonings to taste.
Cover and set aside until ready to serve.
Noodles:
1 8-ounce package of dry egg noodles or medium pasta shapes
olive oil
fresh or dried parsley
Cook noodles according to package directions. Drain.
Drizzle lightly with olive oil and toss to coat; this keeps noodles from sticking together.
Sprinkle with parsley flakes and toss again.
Portion noodles onto serving plates or wide shallow bowls. Top with beef tips and gravy. Serve immediately.
Makes 4 servings.
Dress-Ups:
Add 1/4 cup or so of dry red wine with the water and beef consomme for a richer flavor.
Stir 1/4 cup or so of sour cream just before serving for more of a stroganoff flavor.
Posted by
Annie at Haphazard Homestead
at
6:00 AM
Beef Tips and Gravy
2012-05-17T06:00:00-05:00
Annie at Haphazard Homestead
Recipes|Wild Food|
Comments
Tuesday, May 8, 2012
Adventures in Sourdough - Part One - Starter and Bread
Be forewarned that this "experiment" definitely falls under the heading of haphazard homesteading. I think I jumped into this without being properly prepared. Meh. What else is new?
Last week I followed along with Mamal Diane in making some sourdough starters by catching wild yeast, and then baking with the starter.
This was an experiment of sorts, as we each made three starters: one with whole wheat flour, one with white flour, and one with a 50/50 mix of whole wheat and white flours.
Here is how the starters looked on the first day:
They are each just a mixture of 1/4 cup filtered water and 1/4 cup flour. Each day, I added 1/4 cup filtered water and 1/4 cup flour to each jar, and set them up on a shelf in our living room. Why the living room? Because I have both kombucha and water kefir culturing in the kitchen already. Wild yeasts can cross-culture, and with two already in the kitchen, I didn't want to add another. I could have cultured the sourdough outside, but we had a lot of rain when I first started them, so I didn't want to do that, either.
I also read that it only takes 24-48 hours to catch the yeast for the starter, but I was following Diane's lead. I wanted to do it the way she did, so we could compare notes fairly.
After the first day, they didn't really have much of an odor, but by the second day, they were starting to smell sour. As the week progressed, they got downright stinky. The second day also seemed to be the day they were most bubbly, and when that dissipated, I wondered what kind of results I'd get. I've read that my part of the country (western Missouri) isn't known for strong wild yeast. Not one to let a little technicality like that stop me, I pressed on.
By the 4th or 5th days, the whole wheat and mixed starters were smelling almost fruity, kind of like apple cider. The white flour starter was still stinky. But all were nice and bubbly again.
It wasn't until the 8th day that I mixed up the "sponges", per this recipe that Mamal Diane had linked. I decided for my first round of baking I would use the white flour starter to make three batches - one with white flour, one with a mix of white and wheat flours, and one with whole wheat flour. That way I thought I'd be able to tell how the starter developed each of the types of flour.
Here are the freshly mixed sponges, with whole wheat on the left, white on the right, mixed in the middle.
The sponge needed to sit overnight, so I was able to bake yesterday. Here is what the whole wheat sponge looked like after about 15 hours at room temp.
This is the whole wheat sponge poured out onto the floured counter top. It's also where I became confused by the recipe. It said to work the flour in, but it didn't say how much. So I guessed, based on my previous bread-baking experience. I didn't measure, I just worked in the flour until the dough felt right to me.
Here are the loaves after baking. Again, whole wheat is on the left, white is on the right, mixed is in the middle.
And here they are after cutting. Same order.
Upon tasting, they are all fairly sour. The texture was dense. I'd hoped for a more porous texture, so maybe next time I'll work in a little less flour. The white loaf just tastes sour, while the wheat loaf tasted like sourdough and raisin bran cereal. The mixed loaf had a nicer flavor, but I thought the crust was too thick on all of them. Overall, this isn't quite what I'm looking for.
But, surprise! Kat loves it! We used the bread for pulled pork BBQ sandwiches last night, and then after supper, she asked for more bread. And I heard no complaints from Shane, either, and he is not someone I'd consider a sourdough fan.
I have lots of starter left, so I'll be trying more sourdough recipes for bread, waffles and other baked goods, comparing all three kinds of flour when I do. However, unless I stumble upon a recipe we all love, I'm not going to feed these starters to keep them going. I think I'll try a 48-hour starter to see if that's something I like better.
Stay tuned. I'll be making science in the kitchen again soon!
Last week I followed along with Mamal Diane in making some sourdough starters by catching wild yeast, and then baking with the starter.
This was an experiment of sorts, as we each made three starters: one with whole wheat flour, one with white flour, and one with a 50/50 mix of whole wheat and white flours.
Here is how the starters looked on the first day:
They are each just a mixture of 1/4 cup filtered water and 1/4 cup flour. Each day, I added 1/4 cup filtered water and 1/4 cup flour to each jar, and set them up on a shelf in our living room. Why the living room? Because I have both kombucha and water kefir culturing in the kitchen already. Wild yeasts can cross-culture, and with two already in the kitchen, I didn't want to add another. I could have cultured the sourdough outside, but we had a lot of rain when I first started them, so I didn't want to do that, either.
I also read that it only takes 24-48 hours to catch the yeast for the starter, but I was following Diane's lead. I wanted to do it the way she did, so we could compare notes fairly.
After the first day, they didn't really have much of an odor, but by the second day, they were starting to smell sour. As the week progressed, they got downright stinky. The second day also seemed to be the day they were most bubbly, and when that dissipated, I wondered what kind of results I'd get. I've read that my part of the country (western Missouri) isn't known for strong wild yeast. Not one to let a little technicality like that stop me, I pressed on.
By the 4th or 5th days, the whole wheat and mixed starters were smelling almost fruity, kind of like apple cider. The white flour starter was still stinky. But all were nice and bubbly again.
It wasn't until the 8th day that I mixed up the "sponges", per this recipe that Mamal Diane had linked. I decided for my first round of baking I would use the white flour starter to make three batches - one with white flour, one with a mix of white and wheat flours, and one with whole wheat flour. That way I thought I'd be able to tell how the starter developed each of the types of flour.
Here are the freshly mixed sponges, with whole wheat on the left, white on the right, mixed in the middle.
The sponge needed to sit overnight, so I was able to bake yesterday. Here is what the whole wheat sponge looked like after about 15 hours at room temp.
This is the whole wheat sponge poured out onto the floured counter top. It's also where I became confused by the recipe. It said to work the flour in, but it didn't say how much. So I guessed, based on my previous bread-baking experience. I didn't measure, I just worked in the flour until the dough felt right to me.
Here are the loaves after baking. Again, whole wheat is on the left, white is on the right, mixed is in the middle.
And here they are after cutting. Same order.
Upon tasting, they are all fairly sour. The texture was dense. I'd hoped for a more porous texture, so maybe next time I'll work in a little less flour. The white loaf just tastes sour, while the wheat loaf tasted like sourdough and raisin bran cereal. The mixed loaf had a nicer flavor, but I thought the crust was too thick on all of them. Overall, this isn't quite what I'm looking for.
But, surprise! Kat loves it! We used the bread for pulled pork BBQ sandwiches last night, and then after supper, she asked for more bread. And I heard no complaints from Shane, either, and he is not someone I'd consider a sourdough fan.
I have lots of starter left, so I'll be trying more sourdough recipes for bread, waffles and other baked goods, comparing all three kinds of flour when I do. However, unless I stumble upon a recipe we all love, I'm not going to feed these starters to keep them going. I think I'll try a 48-hour starter to see if that's something I like better.
Stay tuned. I'll be making science in the kitchen again soon!
Posted by
Annie at Haphazard Homestead
at
6:00 AM
Adventures in Sourdough - Part One - Starter and Bread
2012-05-08T06:00:00-05:00
Annie at Haphazard Homestead
Cultured Foods|Healthier Foods|Wild Food|
Comments
Labels:
Cultured Foods,
Healthier Foods,
Wild Food
Monday, April 9, 2012
Canned Fish Is Not Photogenic
Kat didn't have to go to school today, but is unfortunately not feeling well. I have my hands full with caring for her and all the usual things as well, so today's post will be short and sweet.
I hope all of you had a nice weekend, whether you enjoyed Easter, Passover, or just a relaxing weekend. Our weekend was just about like any other -- except for the fish. Shane went on an impromptu fishing trip on Saturday. Or more accurately, a snagging trip, since he and his friend John were fishing for spoonbill (aka paddlefish). If you've never seen a spoonbill, it looks like this:
Shane didn't snag one, but John did. Since he'd already snagged two the day before, he gave the one he got Saturday to us, and we went out to his house to clean it and cook some of it. This fish is not flaky, but firm, similar to swordfish. It is a little wild and fishy tasting, but IMO, not nearly as fishy as river catfish. We enjoyed what we cooked, but John decided he didn't like spoonbill after all. So, in an oddly fortunate turn of events, we ended up with all of the fish John snagged.
It was too late on Saturday to do anything with it, so we waited until Sunday morning, quickly thawed what John had frozen so that we could cut it and bag it our liking, and refroze it. What was fresh from Saturday's catch ended up in jars in the pressure canner. All together, we had 17 pounds. (If any of you are in the know, you know that 17 pounds isn't much of a yield from 3 spooners; all I can really say is that Shane does a more detailed processing of game and fish than John does.) We froze 9 pounds, cooked and ate about 3 pounds and canned the rest to be used later in patties or a salad similar to tuna. Canned fish tastes good, but it makes an ugly picture.
Kat enjoyed the annual Easter egg hunt with her step-dad's extended family. One of her grandmas on that branch of the family tree bought her these Star Wars pancake forms. We haven't tried them out yet, but I'm thinking that a "breakfast for dinner" meal is in order for this week so that we can.
The week ahead looks busy from here. Since the canner was already out, I am canning pinto beans today for the convenience they'll provide later. Tomorrow will be a day to get some housework done and hopefully start sewing an apron I owe a new friend. Wednesday Kat has both a morning and an afternoon doctor appointment so we'll be busy with those all day. Thursday she has an early release day from school and Friday will be another day to catch up on housework. The week's going to fly by, I can tell.
What do you have planned for the week?
I hope all of you had a nice weekend, whether you enjoyed Easter, Passover, or just a relaxing weekend. Our weekend was just about like any other -- except for the fish. Shane went on an impromptu fishing trip on Saturday. Or more accurately, a snagging trip, since he and his friend John were fishing for spoonbill (aka paddlefish). If you've never seen a spoonbill, it looks like this:
Shane didn't snag one, but John did. Since he'd already snagged two the day before, he gave the one he got Saturday to us, and we went out to his house to clean it and cook some of it. This fish is not flaky, but firm, similar to swordfish. It is a little wild and fishy tasting, but IMO, not nearly as fishy as river catfish. We enjoyed what we cooked, but John decided he didn't like spoonbill after all. So, in an oddly fortunate turn of events, we ended up with all of the fish John snagged.
It was too late on Saturday to do anything with it, so we waited until Sunday morning, quickly thawed what John had frozen so that we could cut it and bag it our liking, and refroze it. What was fresh from Saturday's catch ended up in jars in the pressure canner. All together, we had 17 pounds. (If any of you are in the know, you know that 17 pounds isn't much of a yield from 3 spooners; all I can really say is that Shane does a more detailed processing of game and fish than John does.) We froze 9 pounds, cooked and ate about 3 pounds and canned the rest to be used later in patties or a salad similar to tuna. Canned fish tastes good, but it makes an ugly picture.
Kat enjoyed the annual Easter egg hunt with her step-dad's extended family. One of her grandmas on that branch of the family tree bought her these Star Wars pancake forms. We haven't tried them out yet, but I'm thinking that a "breakfast for dinner" meal is in order for this week so that we can.
The week ahead looks busy from here. Since the canner was already out, I am canning pinto beans today for the convenience they'll provide later. Tomorrow will be a day to get some housework done and hopefully start sewing an apron I owe a new friend. Wednesday Kat has both a morning and an afternoon doctor appointment so we'll be busy with those all day. Thursday she has an early release day from school and Friday will be another day to catch up on housework. The week's going to fly by, I can tell.
What do you have planned for the week?
Posted by
Annie at Haphazard Homestead
at
1:26 PM
Canned Fish Is Not Photogenic
2012-04-09T13:26:00-05:00
Annie at Haphazard Homestead
Canning and Preserving|Holidays|Weekends|Wild Food|
Comments
Labels:
Canning and Preserving,
Holidays,
Weekends,
Wild Food
Thursday, February 2, 2012
Making Kombucha Tea
Who here is familiar with kombucha tea? It's a fermented tea drink that is thought to be healthful. If you've not heard of it, here's an excerpt from wiseGEEK, who explains it better than I can:
I was thrilled when I learned in December that an acquaintance, George, makes kombucha tea. Most of the friends we have in common with George think it's just weird and wouldn't even try it, but things like kombucha are right up our alley. George was so pleased that we even knew what he was talking about that he offered us some mothers for free. I made a couple of small "starter" batches just to make sure I could do it right, then I started making gallon-sized batches. Here are the details of the first big batch I made.
Beware that these photos may not be suitable forwimps the "culinarily squeamish".
The jar above contains three scobys and about 1 to 1-1/2 cups of kombucha tea from one of George's batches. The scobys are disc-like and spongy. I read somewhere that they feel like calamari. Yep, that's as good a description as any.
Per directions George gave me (which appear to have come from the Cultures for Health website) I brewed some tea, using 13 cups of distilled water, 1 cup of sugar and 2 Tablespoons of loose tea (or I could have used 8 tea bags). After letting the tea steep until it cooled to room temperature, I strained it to remove the tea leaves, then added 1 scoby and 2 cups of George's kombucha tea. I covered the jar with a coffee filter to keep out dust and other foreign particles. Then I left it to sit on the counter, out of direct sunlight, for several days.
The tea can be ready in as little as 5 days, depending on your taste. We like ours a little more tart, so we leave ours longer. Here is the same jar on Day 9.
Notice how the tea has lightened in color. You can see the new "baby" culture on top and you can also see that the mother floated to the top at some point and attached to the baby. It happens sometimes; other times not. Doesn't really matter.
This is a living culture, so it changes daily and never turns out exactly the same way twice. The tea tastes sweet, tart, musty (like wine, especially homemade wine), and is lightly carbonated. It "tingles" on the tongue when you taste it. If you've ever had homemade ginger beer or soda, it's kind of like that.
Then what? First of all, I reserved a three cups of the new tea -- 2 cups for the next batch I made and 1 cup to cover and protect the new scoby I now had. Then we stored this first batch in the fridge and drank it as it was, either straight or mixed with more of our regular sweet tea. Since then, we've been playing around, using green tea as the base, letting batches ferment for 2, 3 and 4 weeks, mixing some of the tea with fruit juices and other beverages and pouring some into airtight containers to ferment a second time so that it becomes even more carbonated.
Over time, we're going to find ourselves with more babies than we need. When that happens, we can either give them away to someone else who wants to make their own kombucha, or we can compost them. No problemo.
So, that's that. It's an easy process, but not a quick one. It's a real money saver, too, if you're in the habit of drink kombucha tea regularly. Doing a very rough calculation based on costs of tea, sugar and distilled or purified water, a batch like this could cost as little as $1.80 (more if you use organic tea and sugar...I didn't, but I probably should in the future). I get about six 16-ounce servings after taking evaporation into account. That's as little as 30¢ for what would cost at least $3.00 in the store.
I'll be posting more about kombucha as I learn more about the brewing process. If you're eager to learn more about it, check out this tutorial from Cultures for Health. Or just do a Google search and you'll find dozens of links.
Anyone else out there tried kombucha? Would you ever consider making it at home?
Kombucha is a fermented beverage made of tea and bacteria cultures. For the last 2,000 years in Asia, families drank kombucha for its purported medicinal qualities. The special yeast and bacteria cultures are usually circulated person-to-person, although now mixtures can be purchased online. This homeopathic drink tastes tart but full-flavored, like carbonated apple cider. Kombucha recipes have traveled to Korea and Japan, from there to Russia, and finally reached Europe after WWI.Ok, so it doesn't sound all that appetizing, but if you like tart, slightly fizzy drinks, it's a good one. Shane and I both like the commercially-prepared kombucha tea we've tried in the past, but it's kind of dear at $3-$4 for a 12-16 ounce bottle. It's not that easy to find, either, so we'd been trying to find a "mother", also known as a scoby (Symbiotic Culture of Bacteria and Yeast) for a while. The closest we came was talking to a person on craigslist who not only lived too far away, but had a weird schedule and a weirder online presence. When that didn't work out, I put the idea on the back burner.
You must have a "mother brew" to cultivate kombucha, which is why originally it was handed down through generations of a family. Much like yogurt, a cup of kombucha can be reserved to make the next batch. This is because it is a living brew, with microorganisms that are beneficial to our digestive tract and others claim help other internal systems. The culture is not a fungus, as some report, but a mixture of bacteria and yeast that forms a gelatinous, yellowish substance.
I was thrilled when I learned in December that an acquaintance, George, makes kombucha tea. Most of the friends we have in common with George think it's just weird and wouldn't even try it, but things like kombucha are right up our alley. George was so pleased that we even knew what he was talking about that he offered us some mothers for free. I made a couple of small "starter" batches just to make sure I could do it right, then I started making gallon-sized batches. Here are the details of the first big batch I made.
Beware that these photos may not be suitable for
| Three "mothers" (starter cultures) in some kombucha tea that our friend gave us. |
The jar above contains three scobys and about 1 to 1-1/2 cups of kombucha tea from one of George's batches. The scobys are disc-like and spongy. I read somewhere that they feel like calamari. Yep, that's as good a description as any.
Per directions George gave me (which appear to have come from the Cultures for Health website) I brewed some tea, using 13 cups of distilled water, 1 cup of sugar and 2 Tablespoons of loose tea (or I could have used 8 tea bags). After letting the tea steep until it cooled to room temperature, I strained it to remove the tea leaves, then added 1 scoby and 2 cups of George's kombucha tea. I covered the jar with a coffee filter to keep out dust and other foreign particles. Then I left it to sit on the counter, out of direct sunlight, for several days.
| Brewed sweet tea with a scoby and some kombucha tea added. |
| Closer look at the scoby in my first big batch. |
The tea can be ready in as little as 5 days, depending on your taste. We like ours a little more tart, so we leave ours longer. Here is the same jar on Day 9.
Notice how the tea has lightened in color. You can see the new "baby" culture on top and you can also see that the mother floated to the top at some point and attached to the baby. It happens sometimes; other times not. Doesn't really matter.
This is a living culture, so it changes daily and never turns out exactly the same way twice. The tea tastes sweet, tart, musty (like wine, especially homemade wine), and is lightly carbonated. It "tingles" on the tongue when you taste it. If you've ever had homemade ginger beer or soda, it's kind of like that.
Then what? First of all, I reserved a three cups of the new tea -- 2 cups for the next batch I made and 1 cup to cover and protect the new scoby I now had. Then we stored this first batch in the fridge and drank it as it was, either straight or mixed with more of our regular sweet tea. Since then, we've been playing around, using green tea as the base, letting batches ferment for 2, 3 and 4 weeks, mixing some of the tea with fruit juices and other beverages and pouring some into airtight containers to ferment a second time so that it becomes even more carbonated.
Over time, we're going to find ourselves with more babies than we need. When that happens, we can either give them away to someone else who wants to make their own kombucha, or we can compost them. No problemo.
So, that's that. It's an easy process, but not a quick one. It's a real money saver, too, if you're in the habit of drink kombucha tea regularly. Doing a very rough calculation based on costs of tea, sugar and distilled or purified water, a batch like this could cost as little as $1.80 (more if you use organic tea and sugar...I didn't, but I probably should in the future). I get about six 16-ounce servings after taking evaporation into account. That's as little as 30¢ for what would cost at least $3.00 in the store.
I'll be posting more about kombucha as I learn more about the brewing process. If you're eager to learn more about it, check out this tutorial from Cultures for Health. Or just do a Google search and you'll find dozens of links.
Anyone else out there tried kombucha? Would you ever consider making it at home?
Posted by
Annie at Haphazard Homestead
at
6:00 AM
Making Kombucha Tea
2012-02-02T06:00:00-06:00
Annie at Haphazard Homestead
Drinks|Fermenting|Healthier Foods|Wild Food|
Comments
Labels:
Drinks,
Fermenting,
Healthier Foods,
Wild Food
Subscribe to:
Posts (Atom)

